> ## Documentation Index
> Fetch the complete documentation index at: https://docs.runlayer.com/llms.txt
> Use this file to discover all available pages before exploring further.
# Adding GitHub MCP server
> Add the GitHub MCP server via the OAuth Broker (hosted) or a pre-registered OAuth app (self-hosted)
**Hosted by a third party.** This MCP server is built and hosted by the
vendor, not Runlayer. This guide covers connecting it through Runlayer for
governance, policies, and audit.
There are two ways to add the GitHub MCP server, depending on your deployment:
* **OAuth Broker** — the default on Runlayer-hosted instances. GitHub works automatically with no setup.
* **Pre-Registered Client** — for self-hosted deployments (where the broker isn't available) or when you want to bring your own GitHub OAuth app.
## OAuth Broker
On Runlayer-hosted instances, GitHub works automatically through the [OAuth Broker](/oauth-broker) — no OAuth app, client ID, or secret required. The broker handles all OAuth flows transparently using an allow-listed redirect URI.
1. In your Runlayer instance, go to **Connectors** → **Add Connector** → **GitHub** → **Create New**
2. Leave **Registration** set to **OAuth Broker** (the default) — no credentials are required
3. Click **Create Hosted MCP**
1. After creating the server, you'll be redirected to the server details page
2. Under **Missing Authorization**, click **Connect**
3. This opens GitHub's OAuth authorization page
4. Review the requested permissions and select repositories
5. Click **Authorize** to complete the flow
After successful authorization, you'll be redirected back to Runlayer. The server will now show:
* **Active** status
* List of available tools (e.g., `create_branch`, `add_issue_comment`, etc.)
* **Revoke access** option in the server settings
## Pre-Registered Client
Use this path if you **self-host** Runlayer (where the broker isn't available) or you want to **bring your own** GitHub OAuth app for dedicated rate limits, custom scopes, or organization-specific compliance.
### Prerequisites
* Access to your Runlayer instance
* GitHub organization admin permissions
* Admin permissions in Runlayer (to add servers)
### Setup Steps
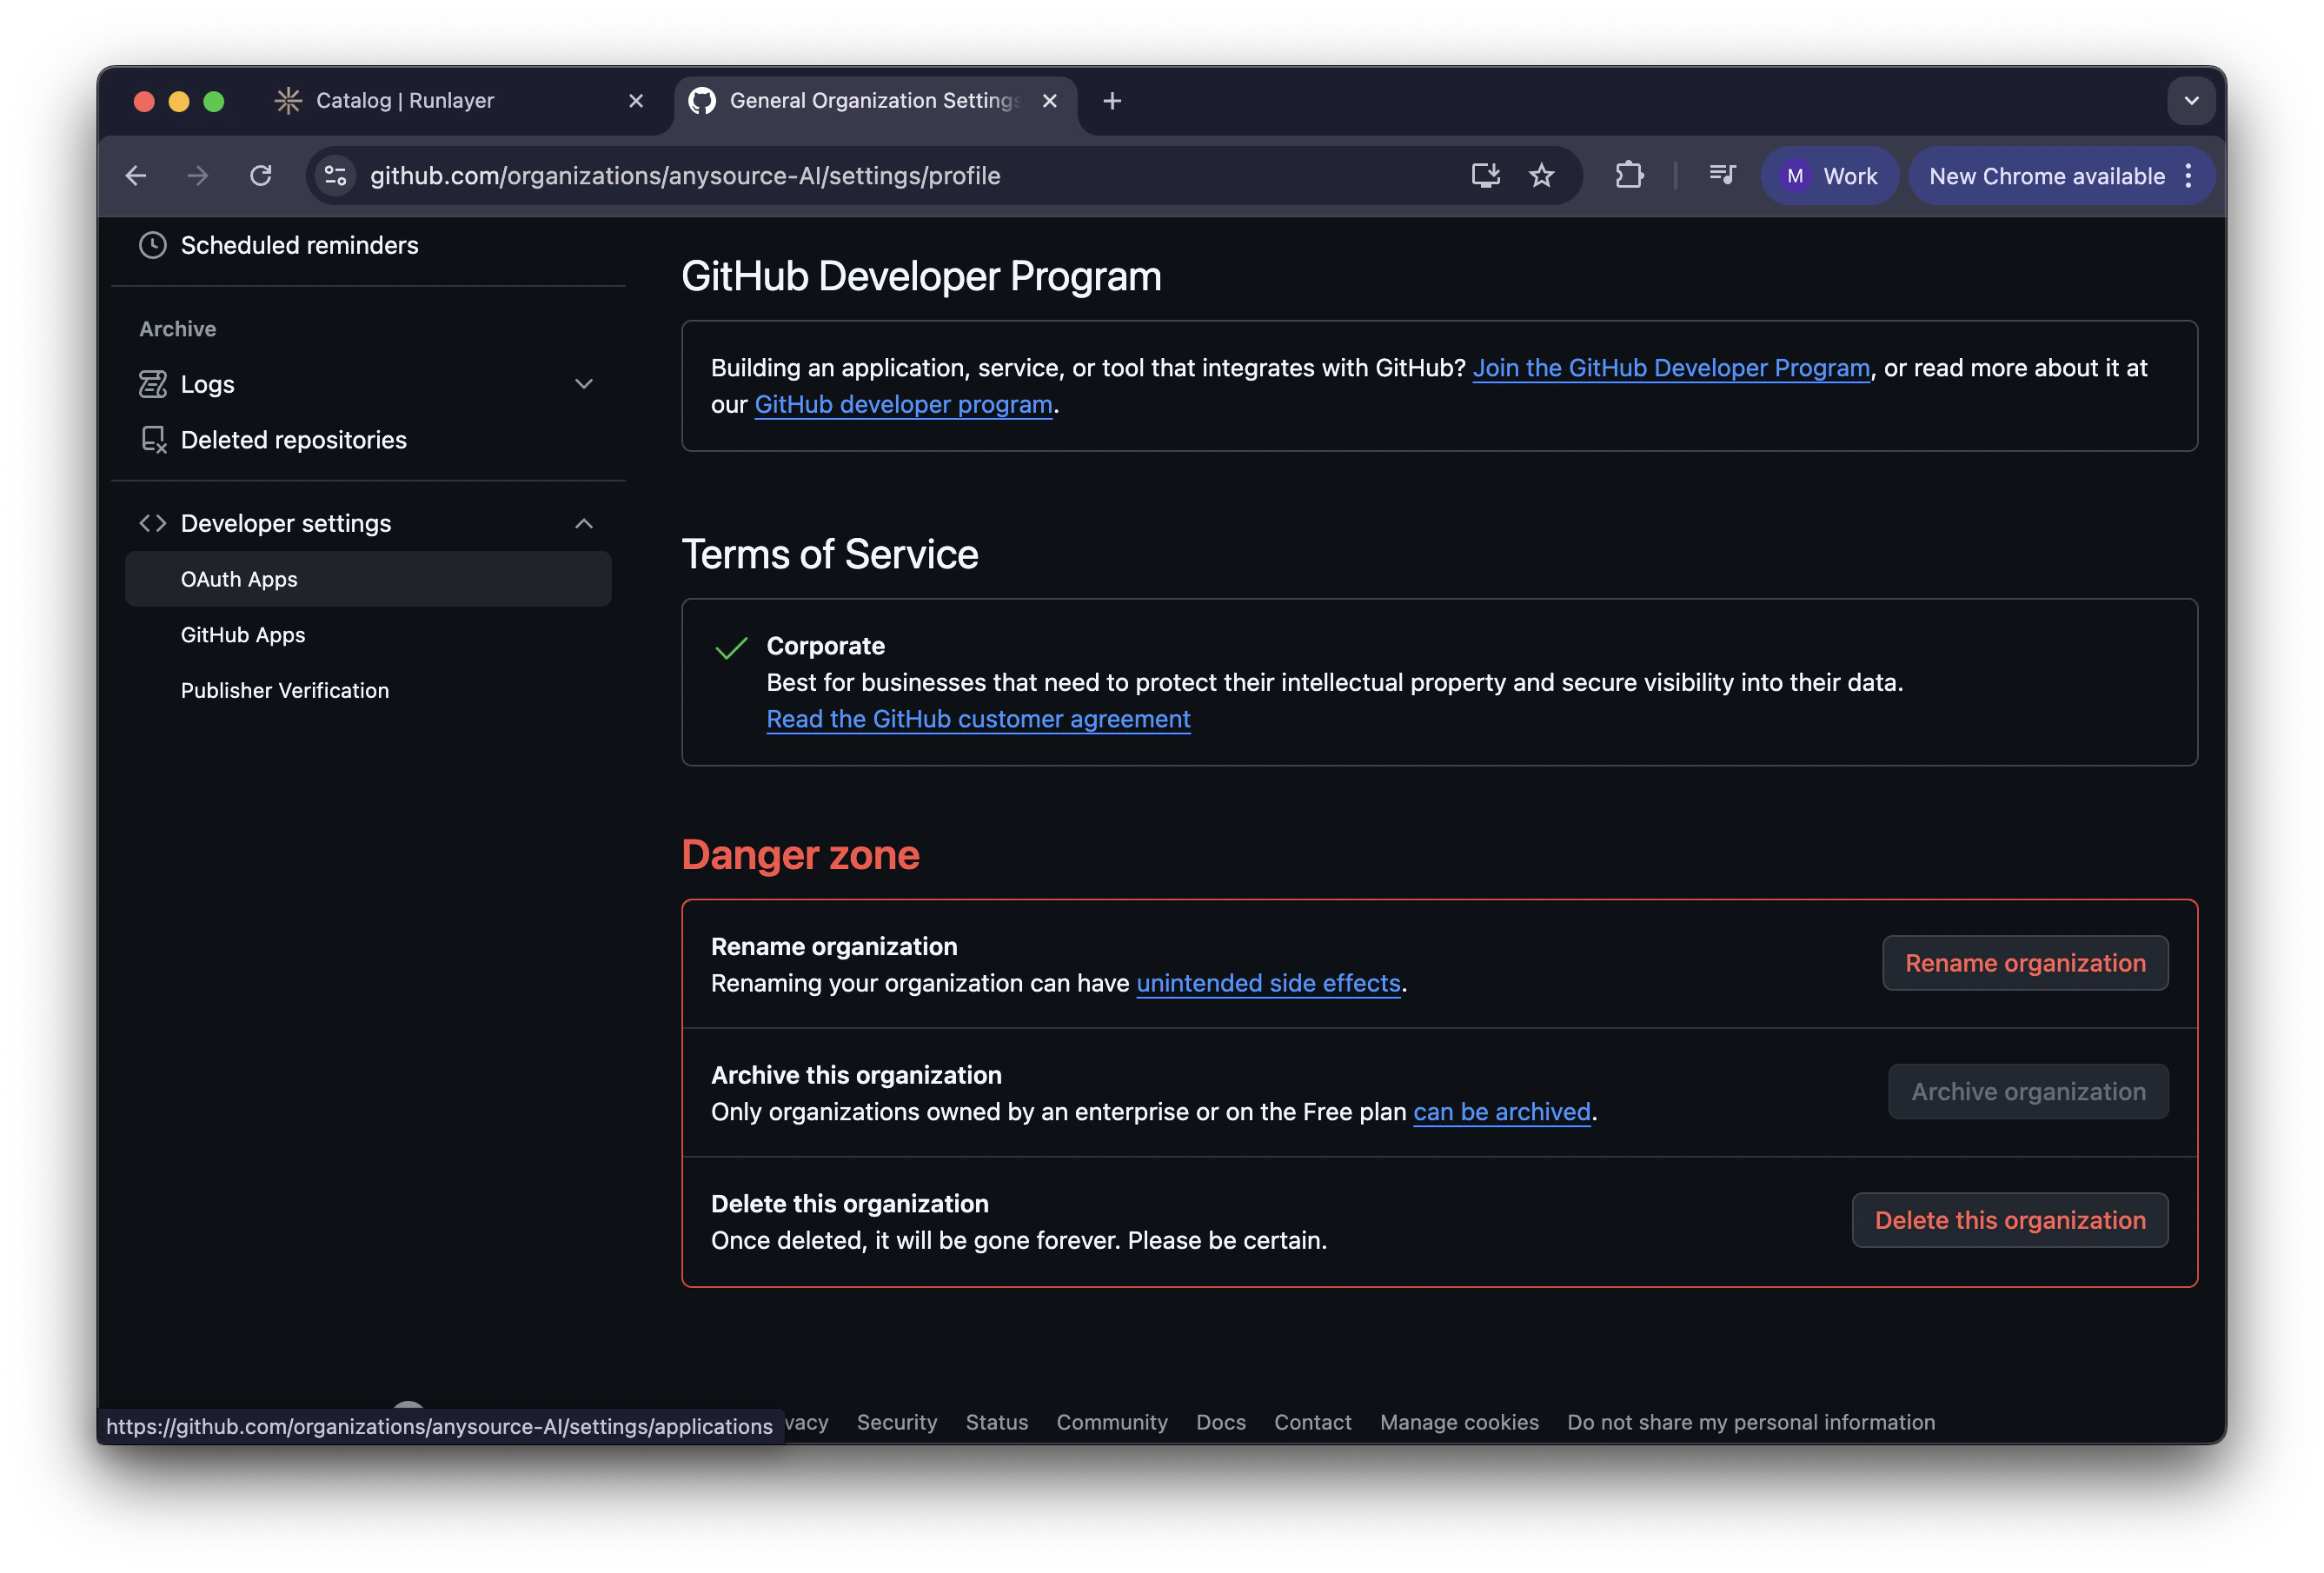
1. Go to your organization's [Developer Settings](https://github.com/organizations/YOUR-ORG/settings/applications/new)
* Navigate to **Settings** → **Developer settings** → **OAuth Apps** → **New OAuth app**
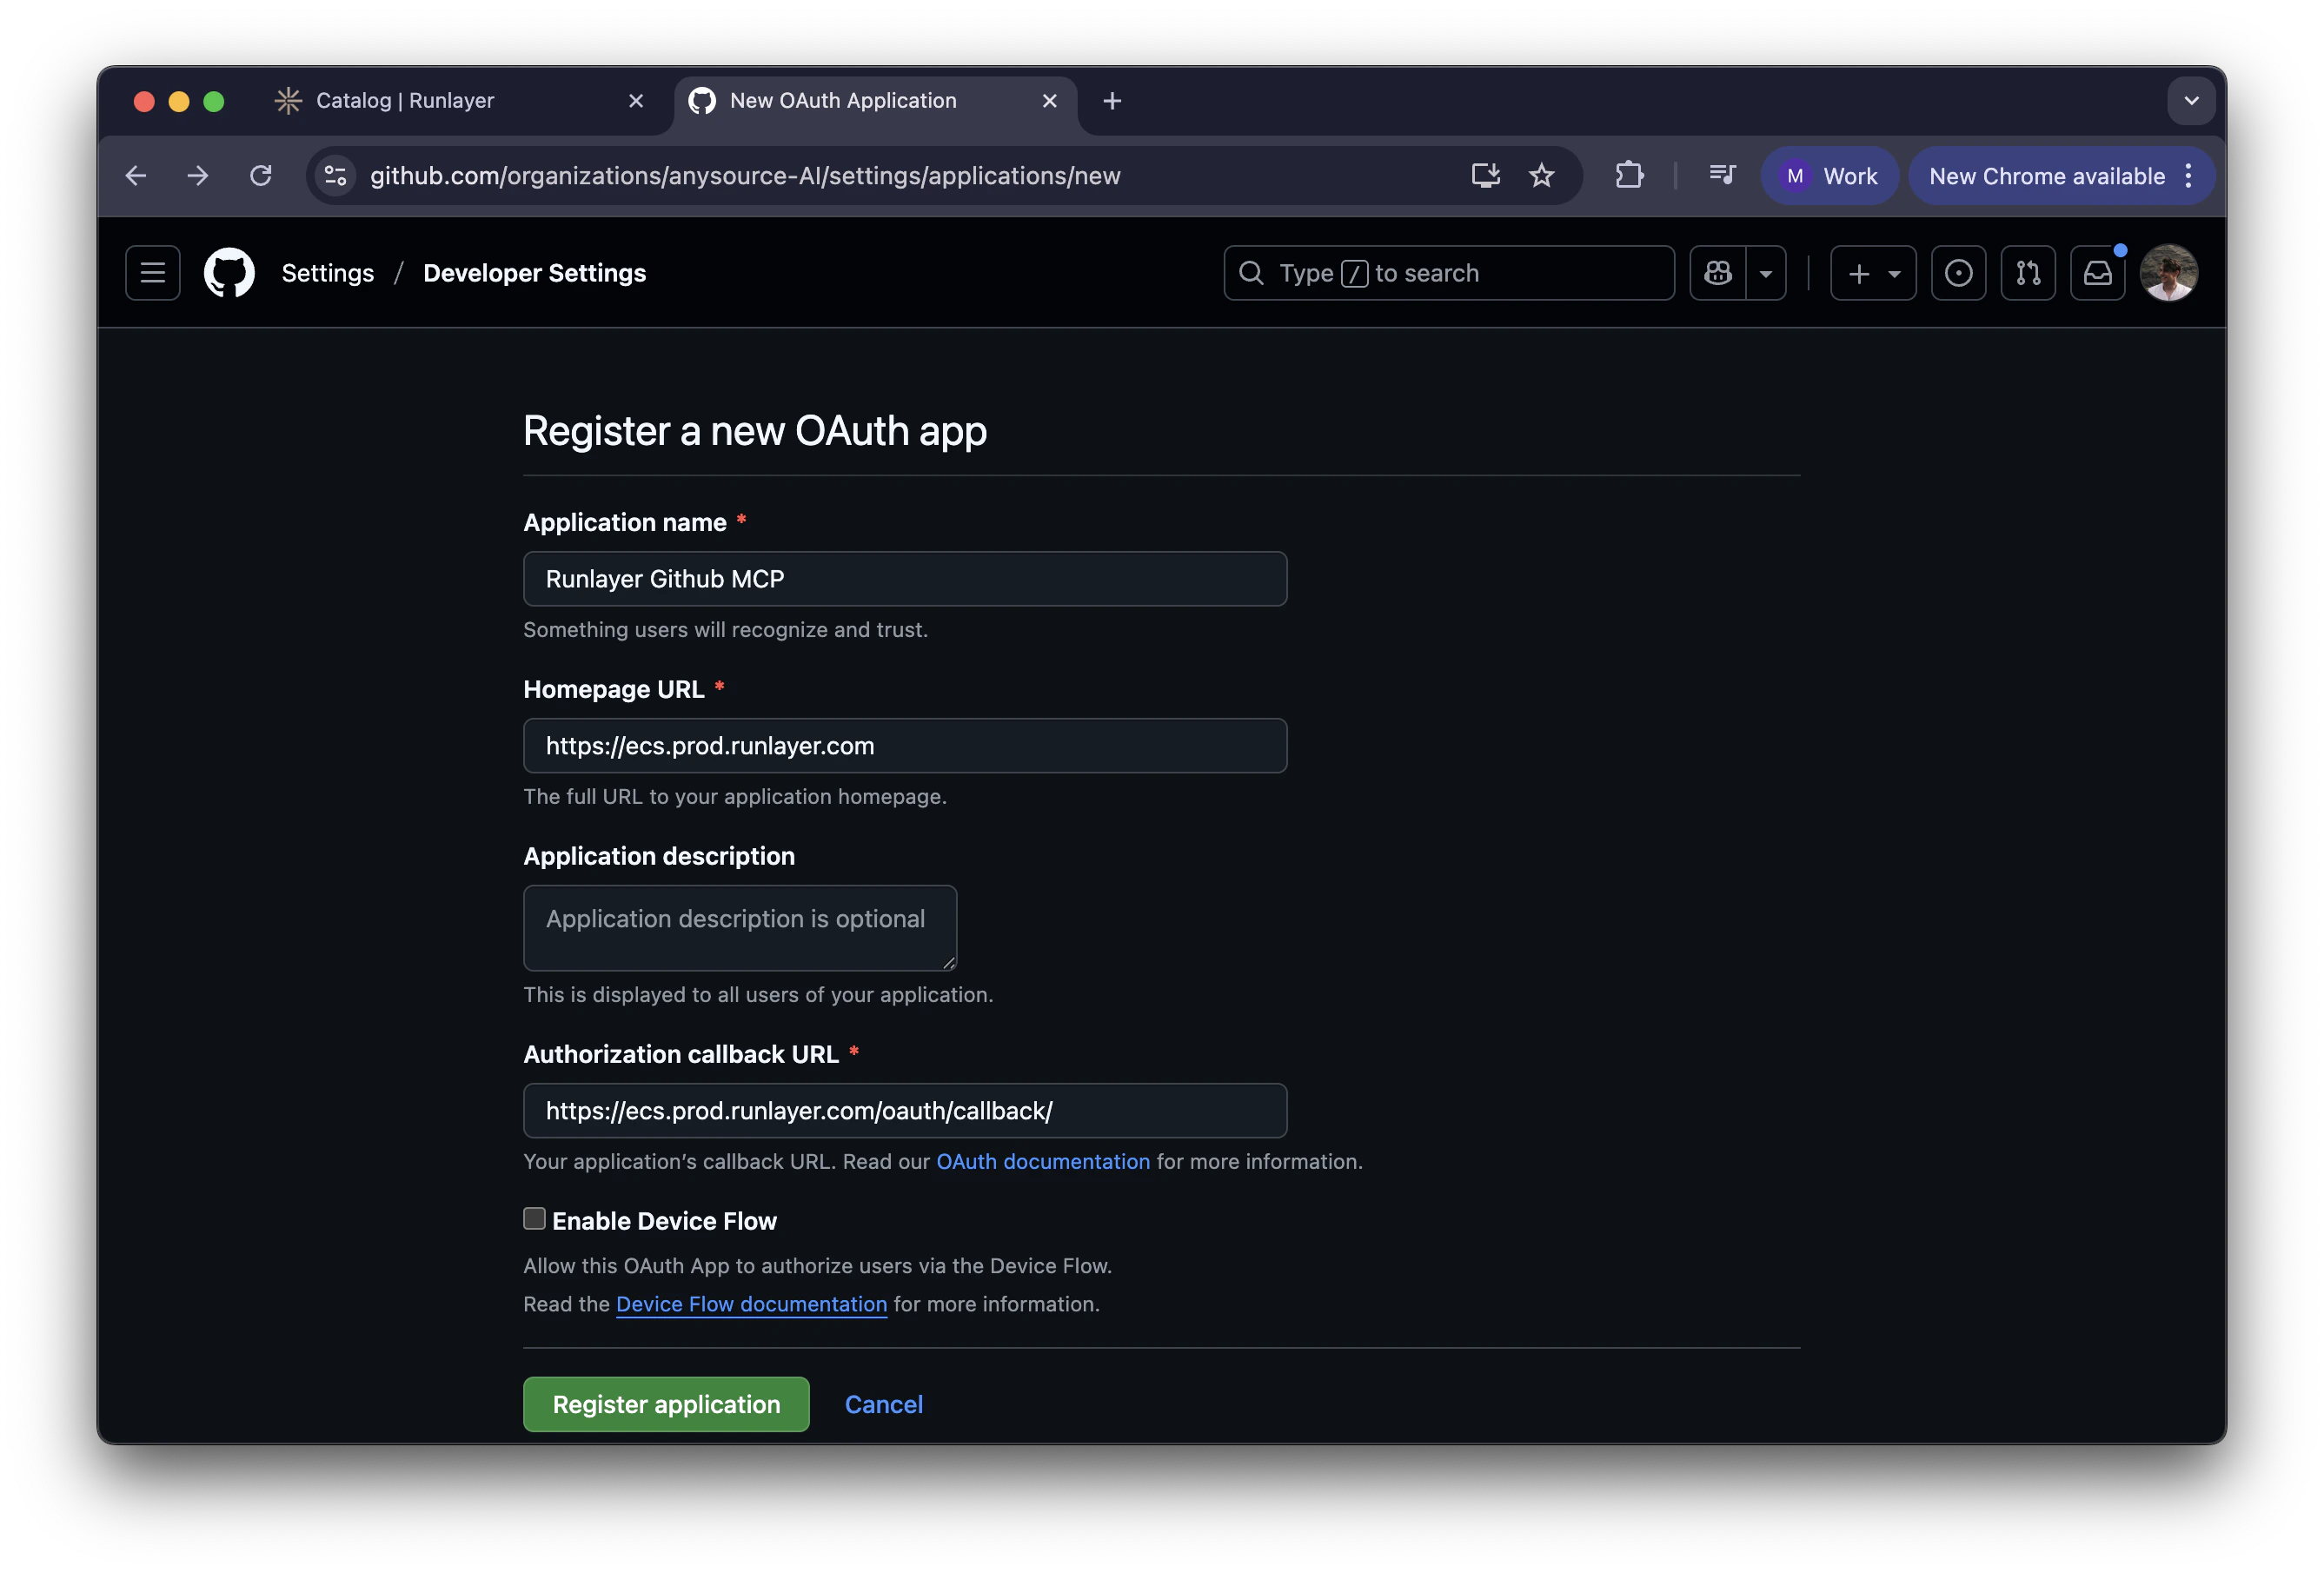
 2. Fill in the details:
* **Application name**: Choose a name (e.g., `Runlayer MCP`)
* **Homepage URL**: Your Runlayer instance URL
* **Authorization callback URL**: `https://.runlayer.com/oauth/callback/`
* For self-hosted: Use your exact tenant URL
3. Click **Register application**
2. Fill in the details:
* **Application name**: Choose a name (e.g., `Runlayer MCP`)
* **Homepage URL**: Your Runlayer instance URL
* **Authorization callback URL**: `https://.runlayer.com/oauth/callback/`
* For self-hosted: Use your exact tenant URL
3. Click **Register application**
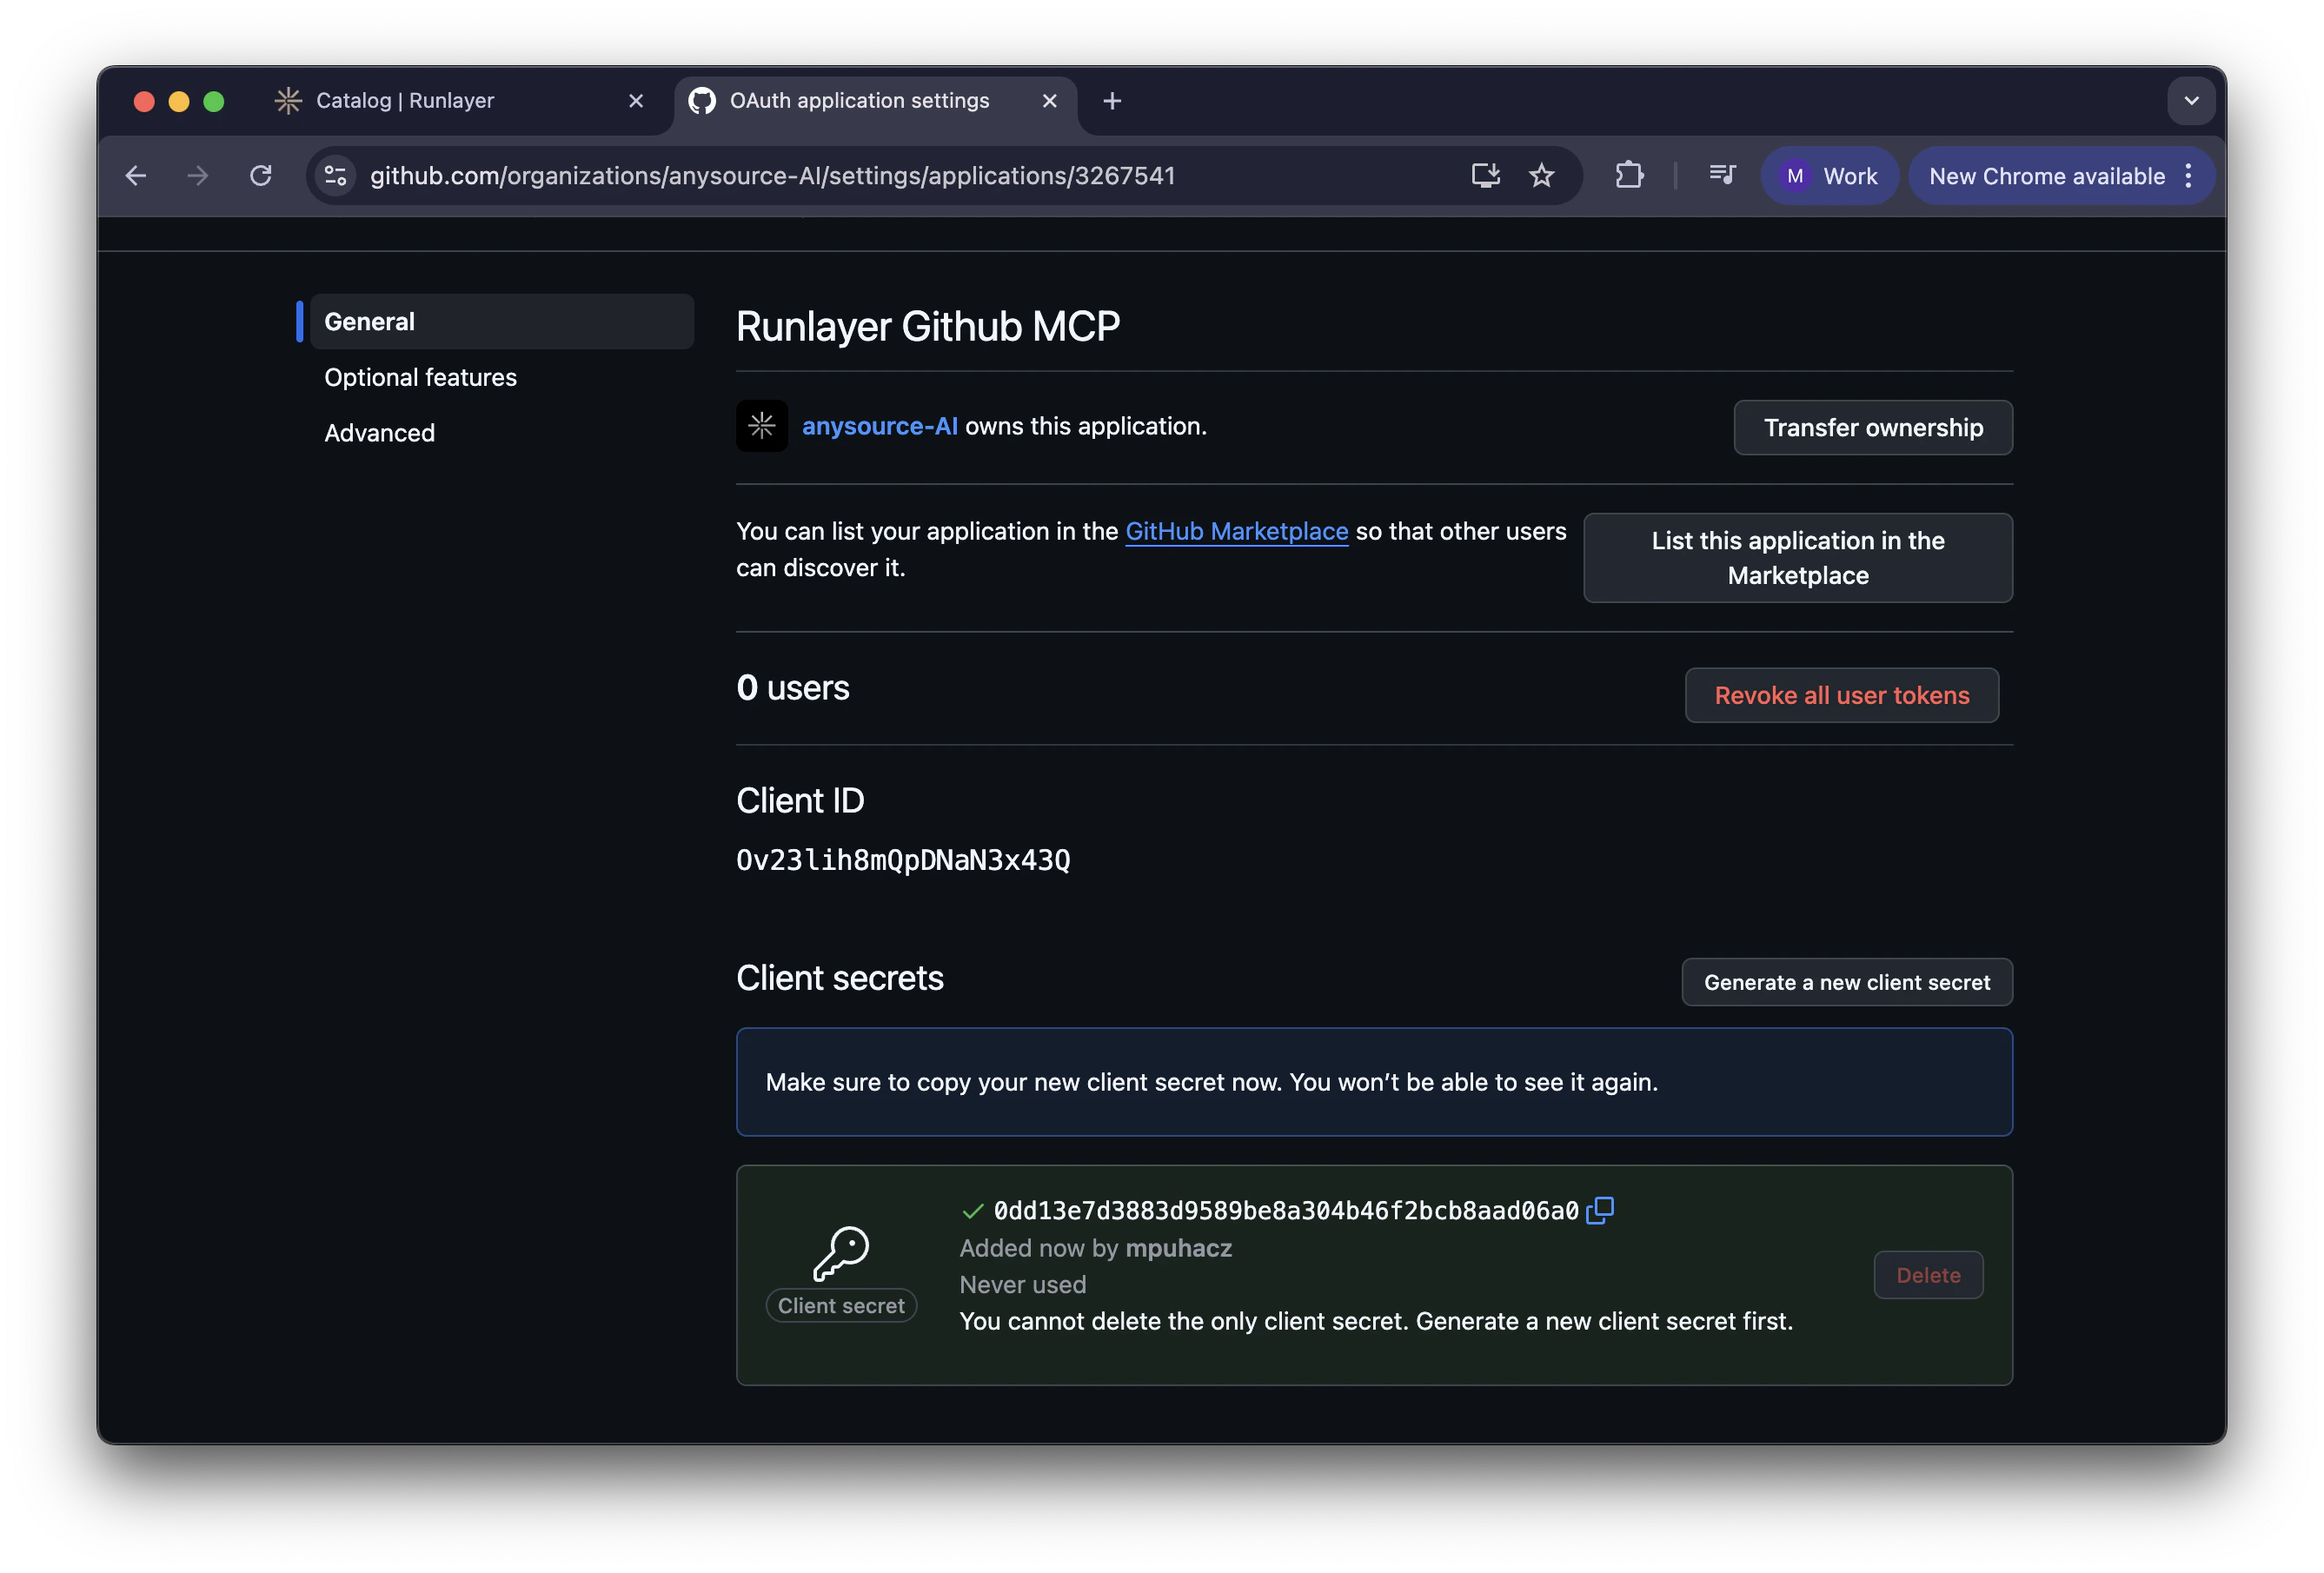
 1. After creating the app, you'll see the **Client ID** (save this)
2. Click **Generate a new client secret**
3. Copy the **Client Secret** immediately (it's only shown once)
4. Save both credentials temporarily in a secure location
1. After creating the app, you'll see the **Client ID** (save this)
2. Click **Generate a new client secret**
3. Copy the **Client Secret** immediately (it's only shown once)
4. Save both credentials temporarily in a secure location
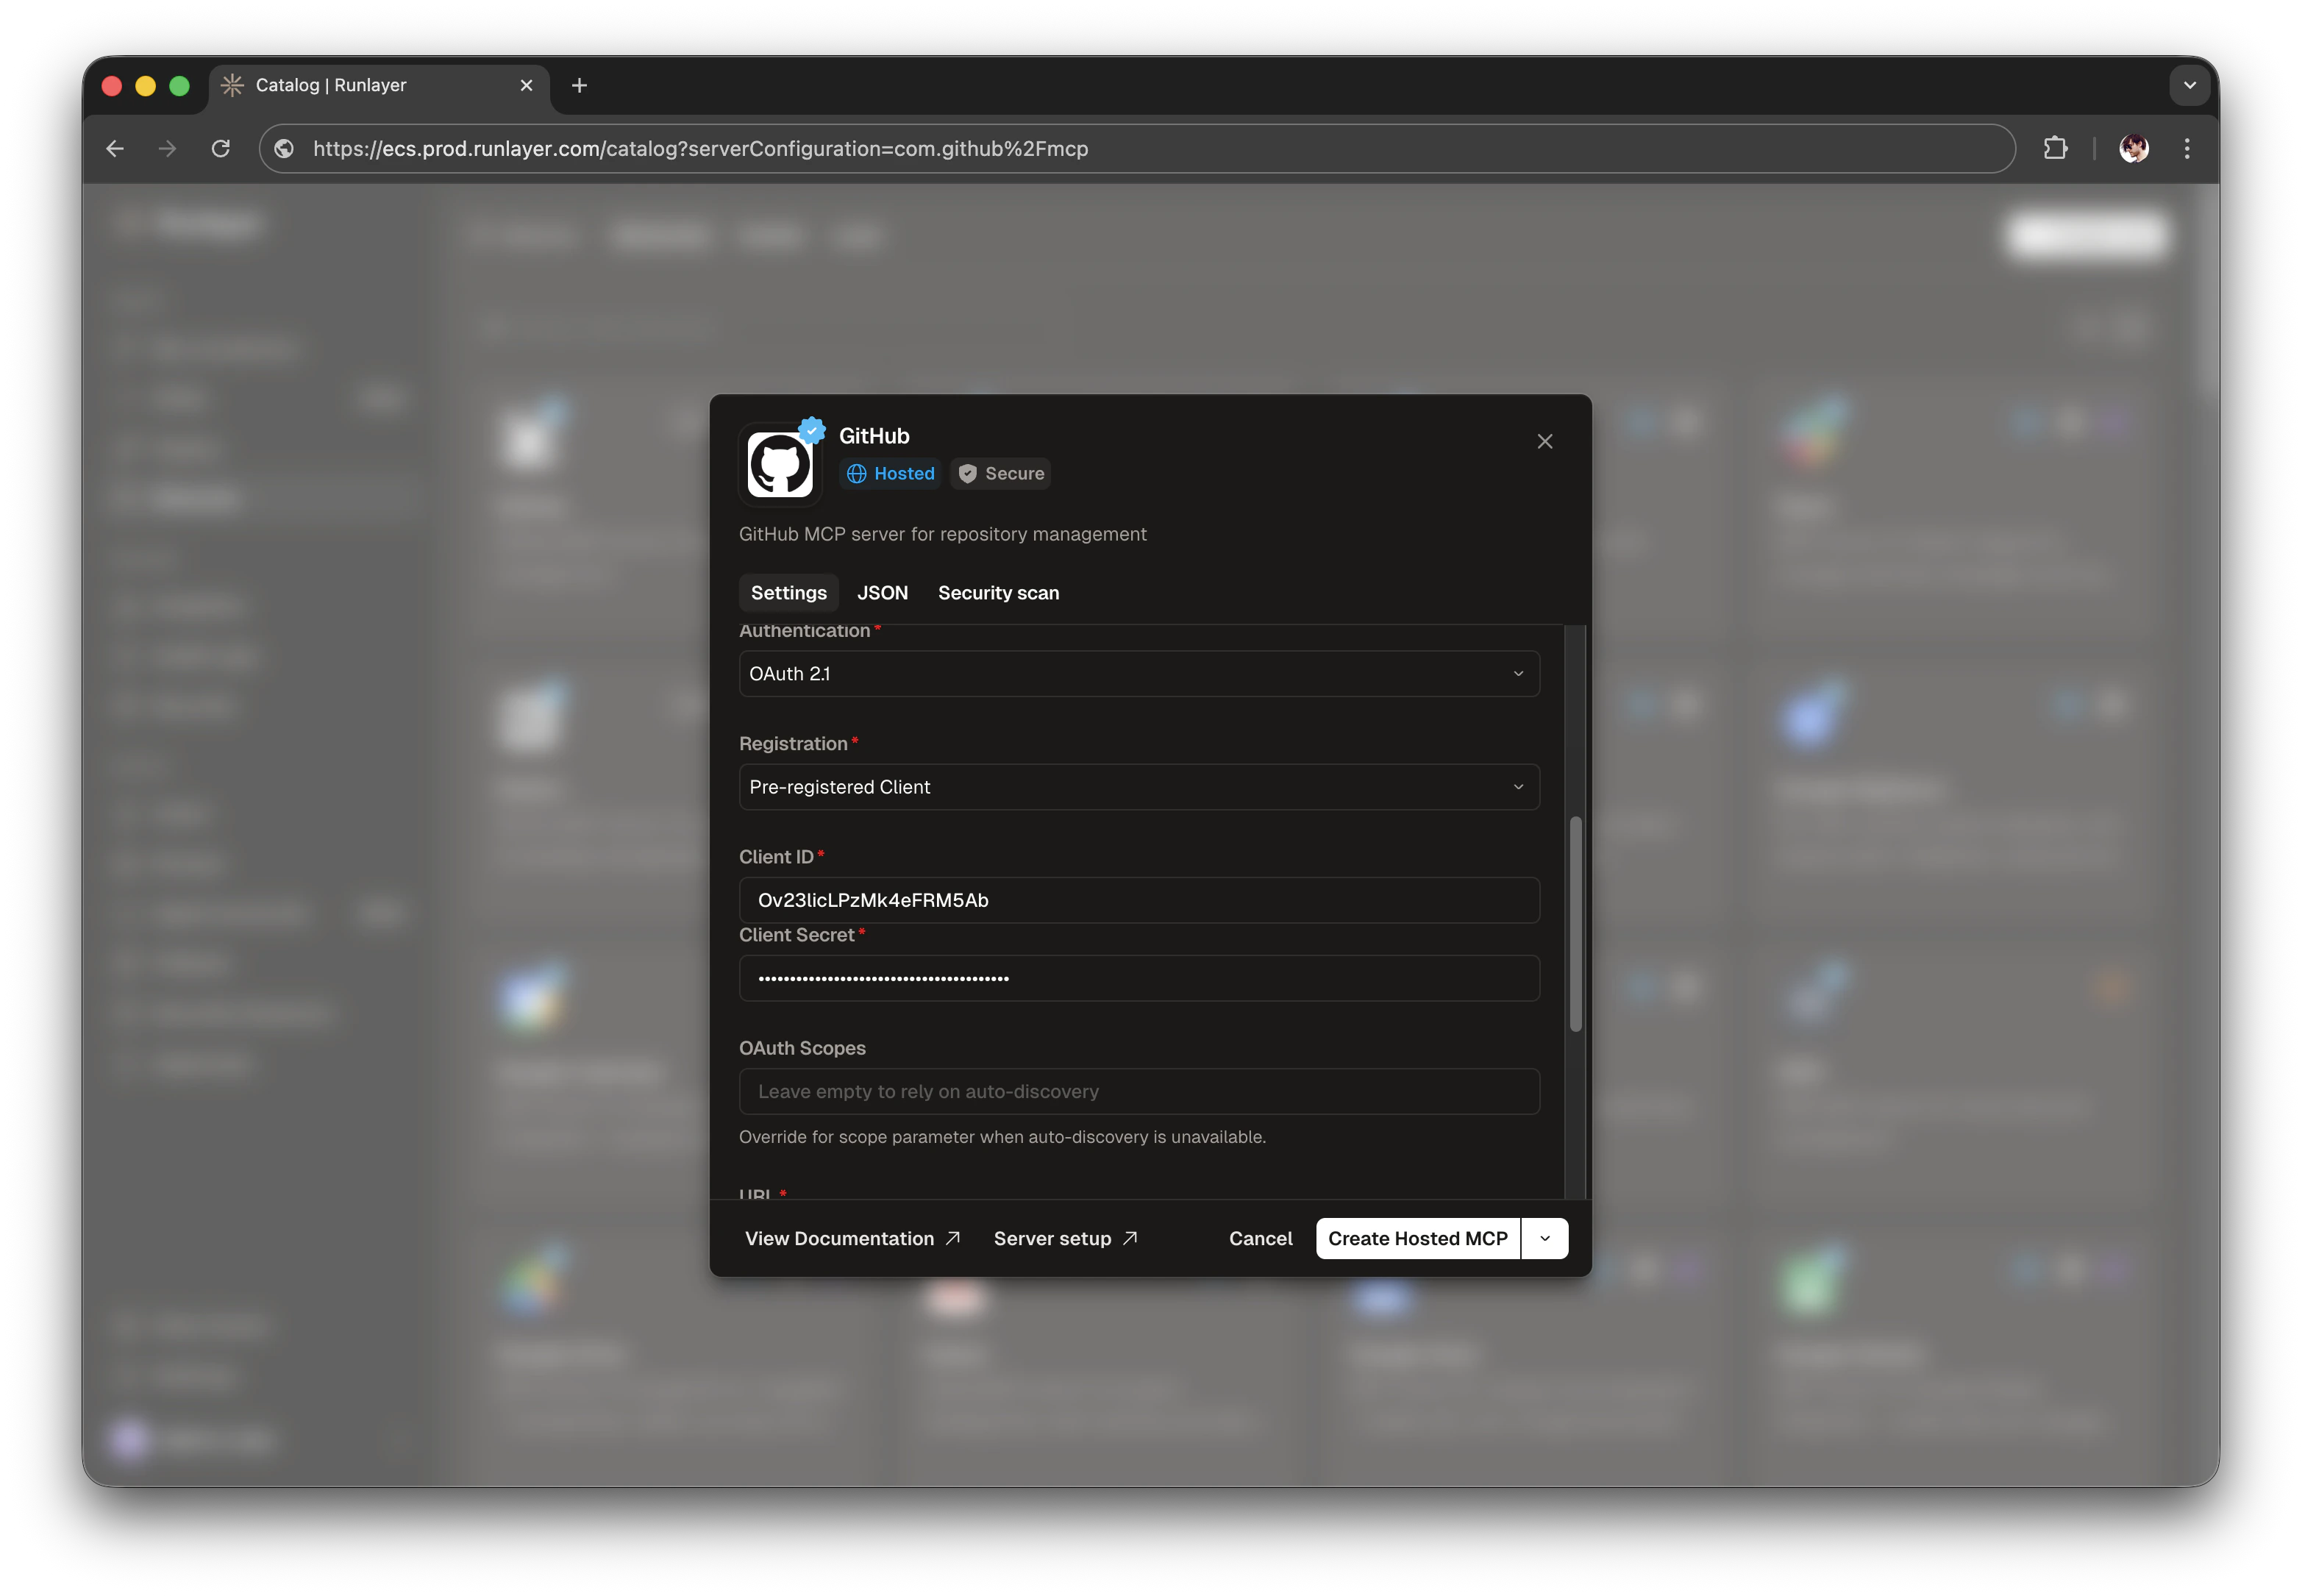
 1. In your Runlayer instance, go to **Connectors** → **Add Connector** → **GitHub** → **Create New**
2. In the server configuration form:
* Expand advanced settings
* Select **Pre-registered Client** in **Registration**
* Enter your **Client ID** and **Client Secret**
3. Click **Create Hosted MCP**
1. In your Runlayer instance, go to **Connectors** → **Add Connector** → **GitHub** → **Create New**
2. In the server configuration form:
* Expand advanced settings
* Select **Pre-registered Client** in **Registration**
* Enter your **Client ID** and **Client Secret**
3. Click **Create Hosted MCP**
 1. After creating the server, you'll be redirected to the server details page
2. Under **Missing Authorization**, click **Connect**
1. After creating the server, you'll be redirected to the server details page
2. Under **Missing Authorization**, click **Connect**
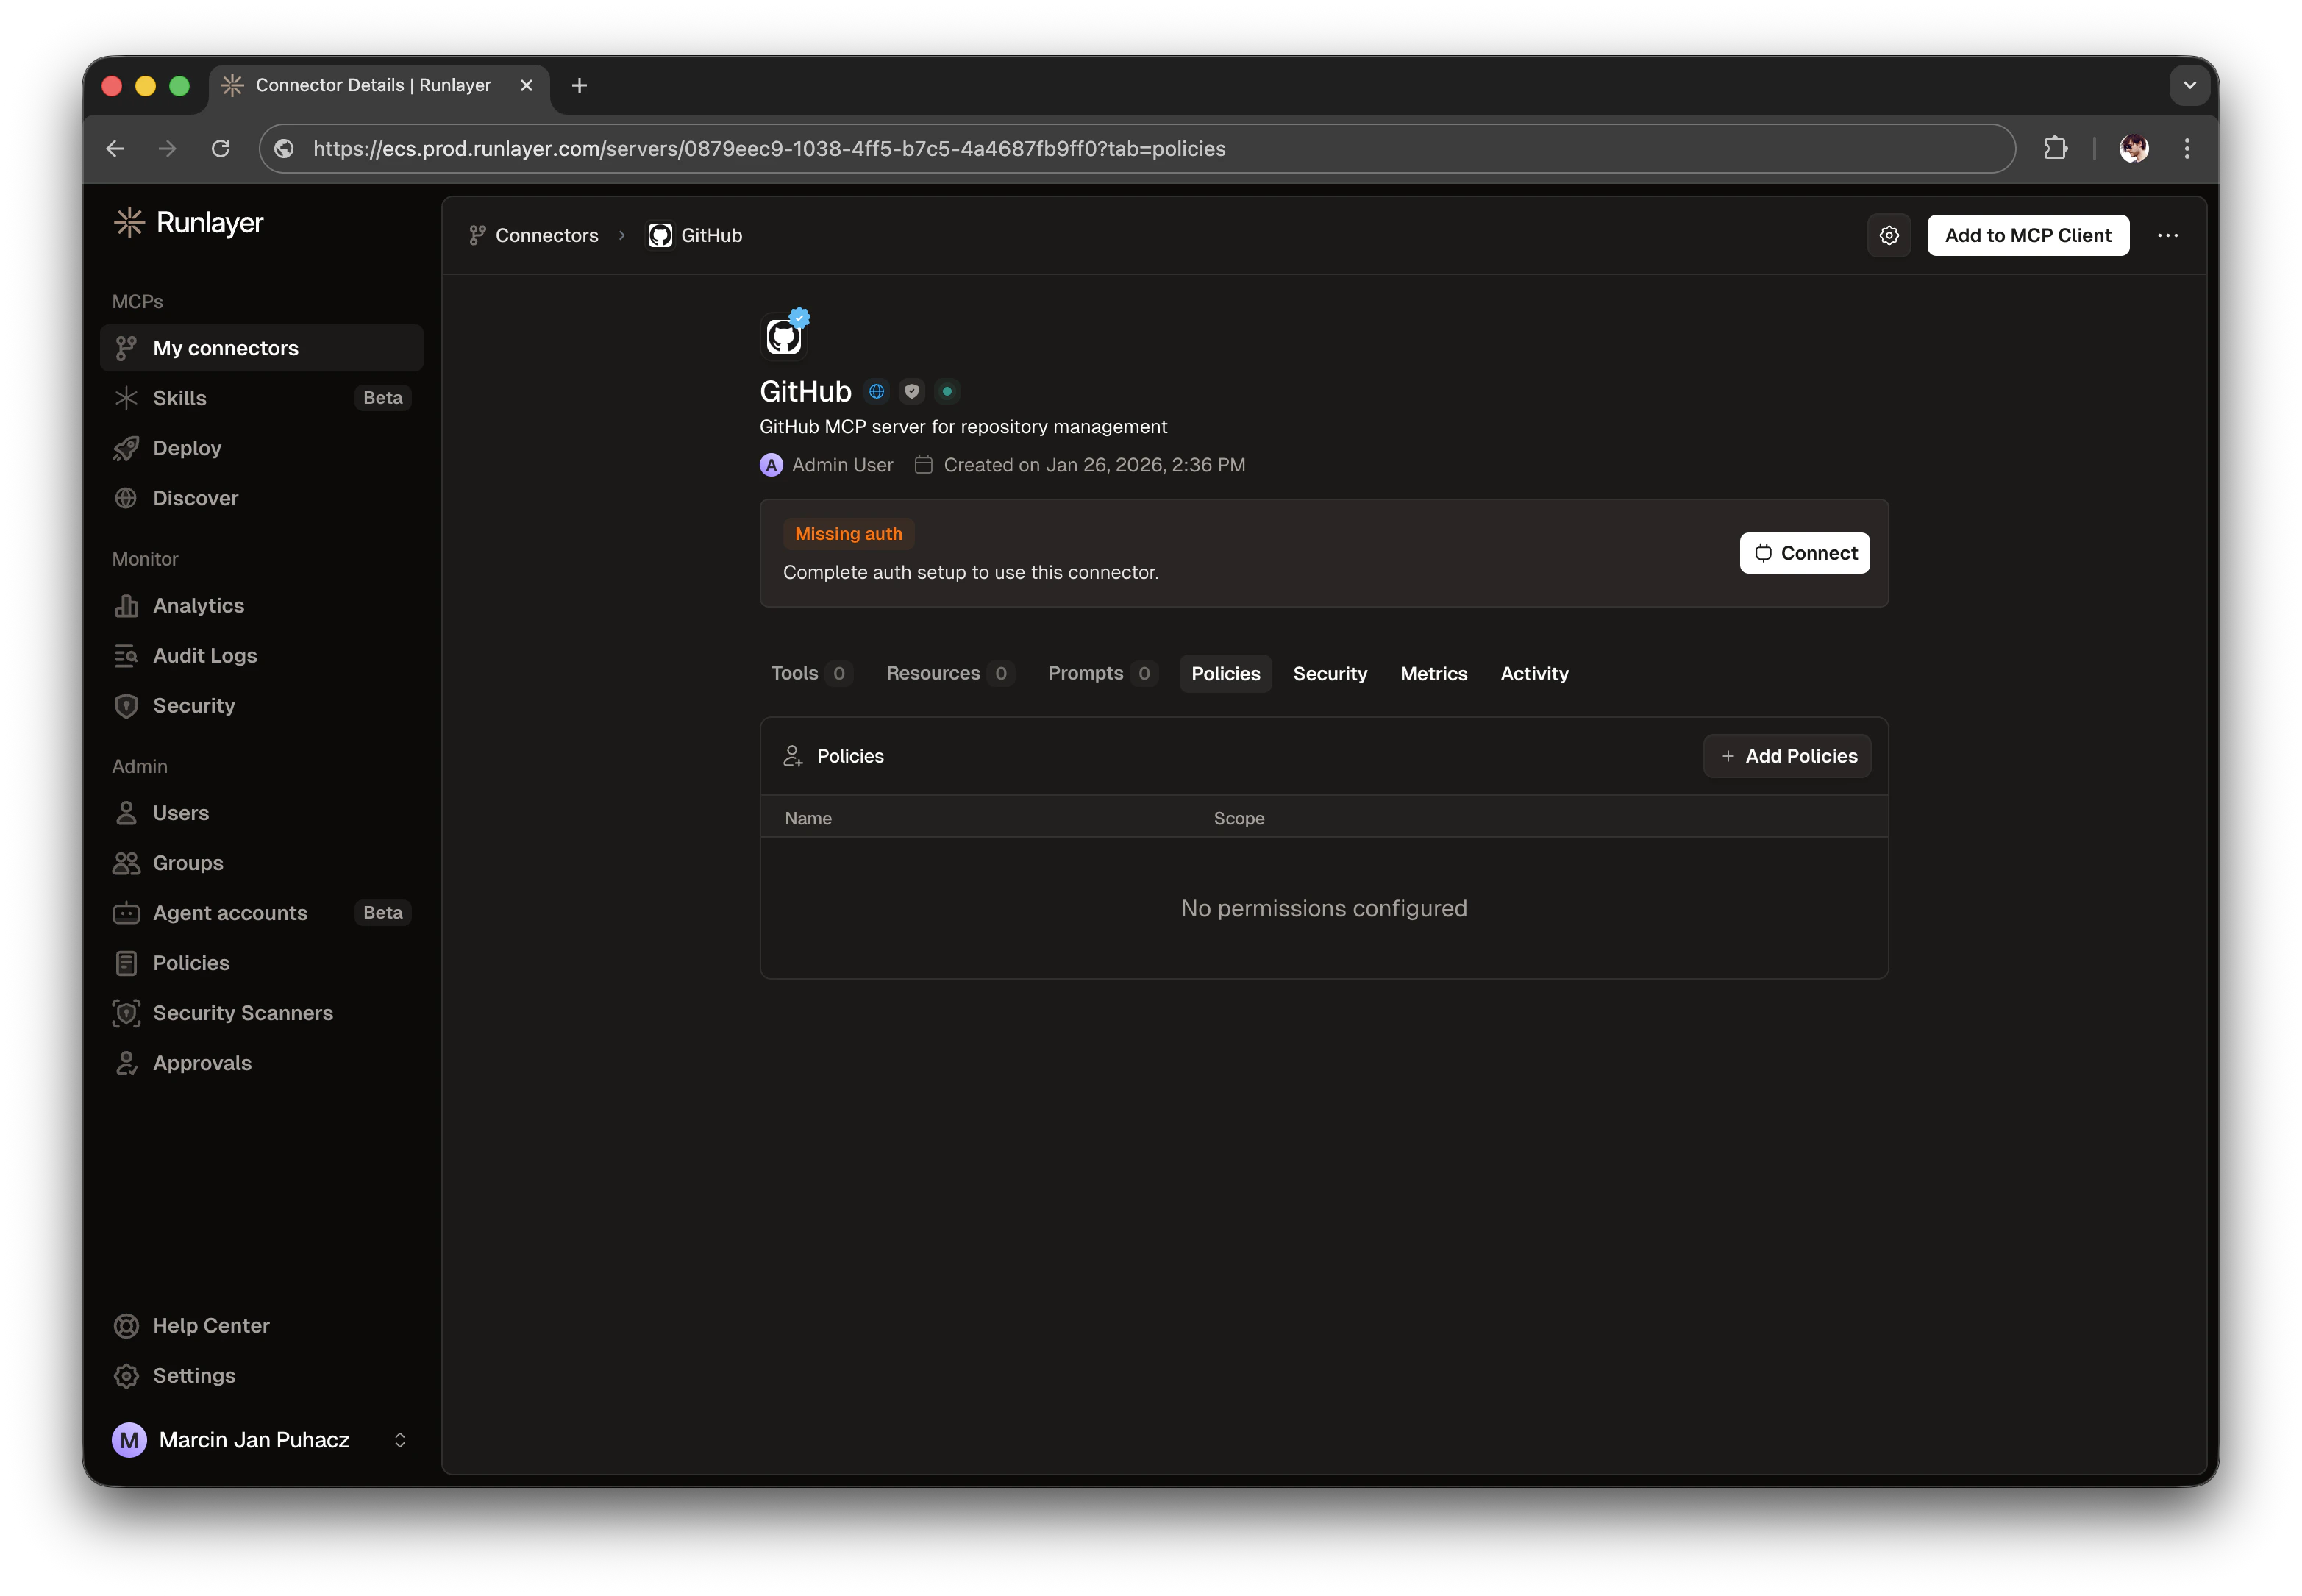 3. This opens GitHub's OAuth authorization page
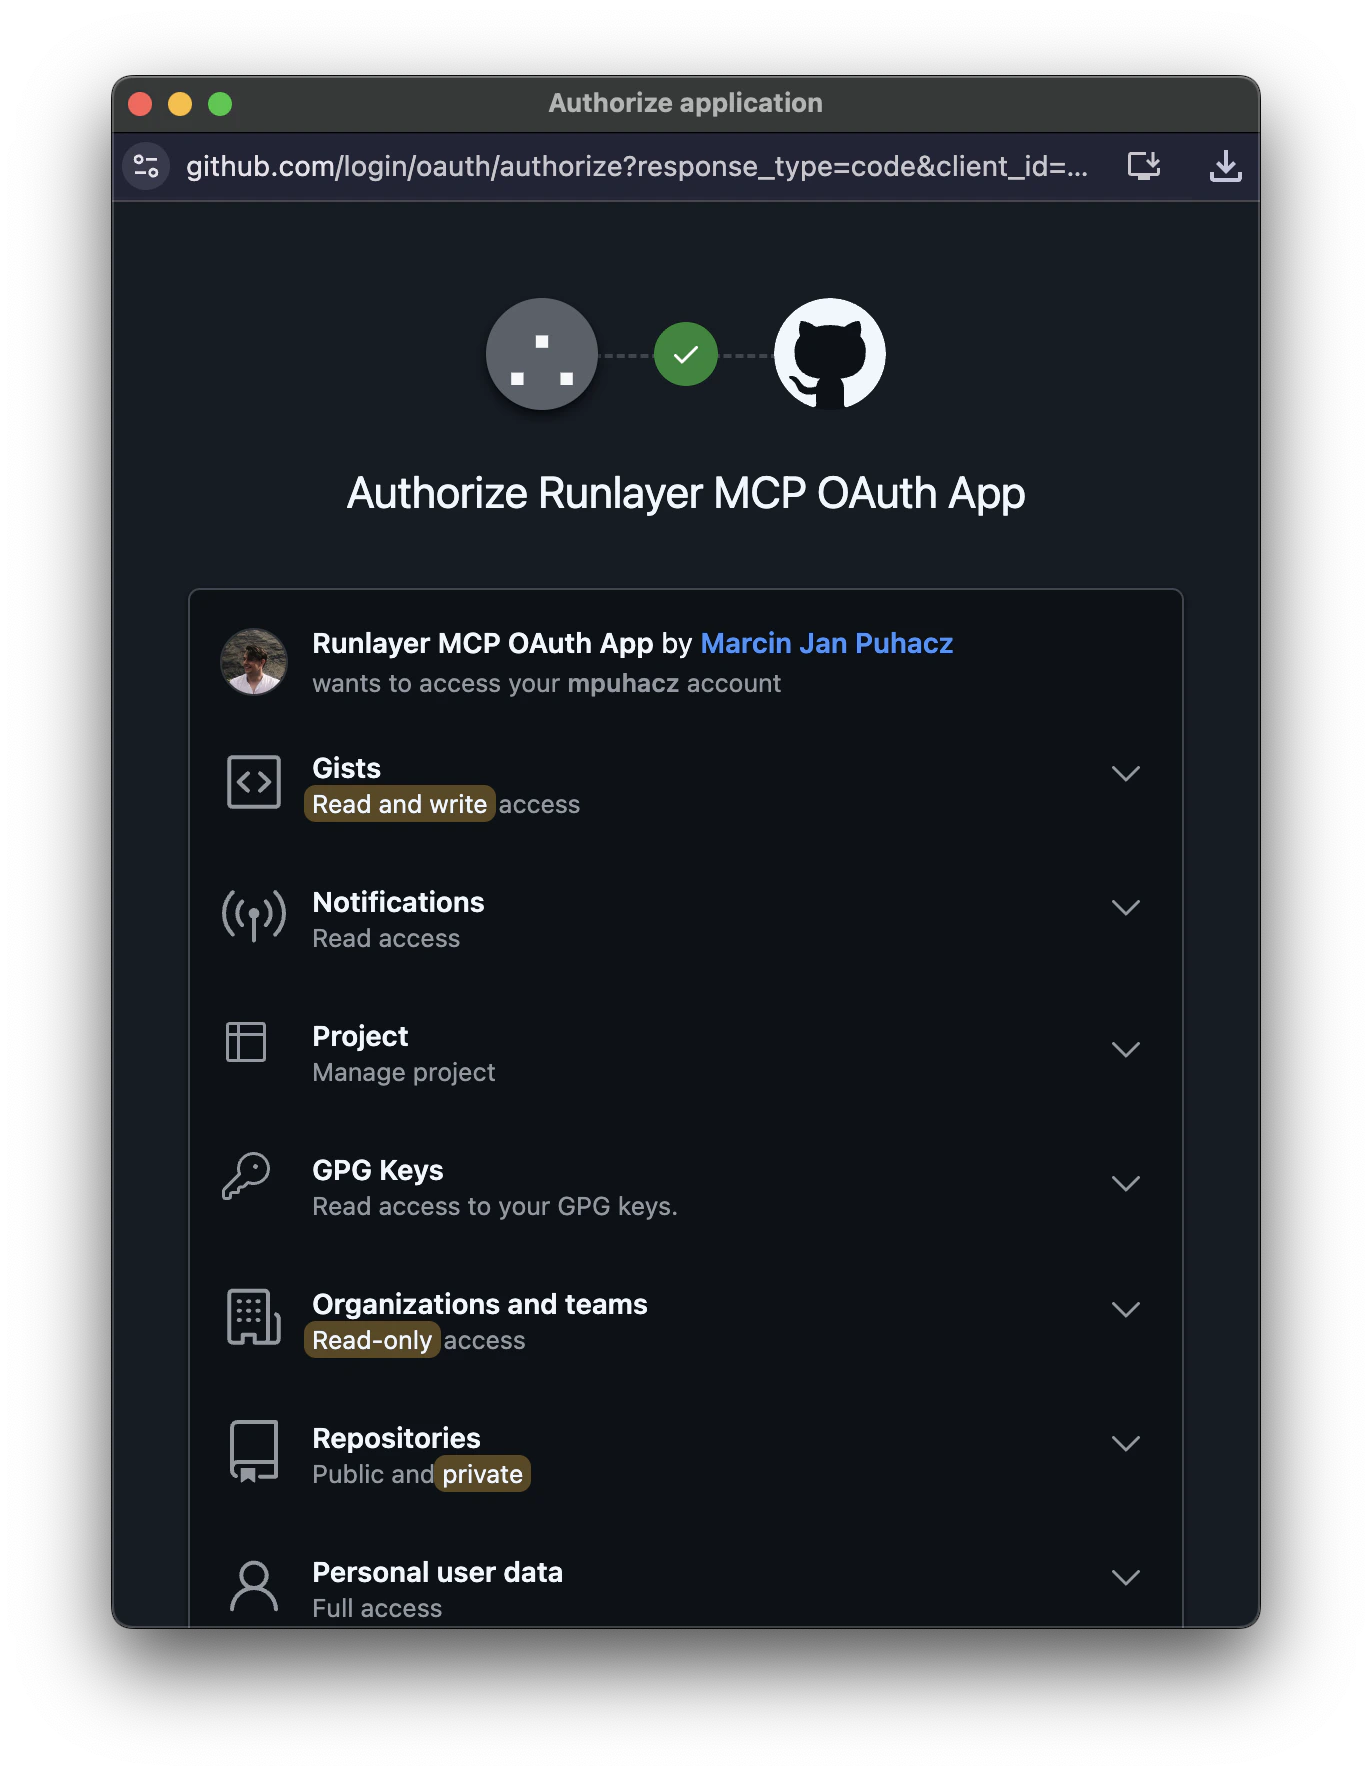 4. Review the requested permissions and select repositories
5. Click **Authorize** to complete the flow
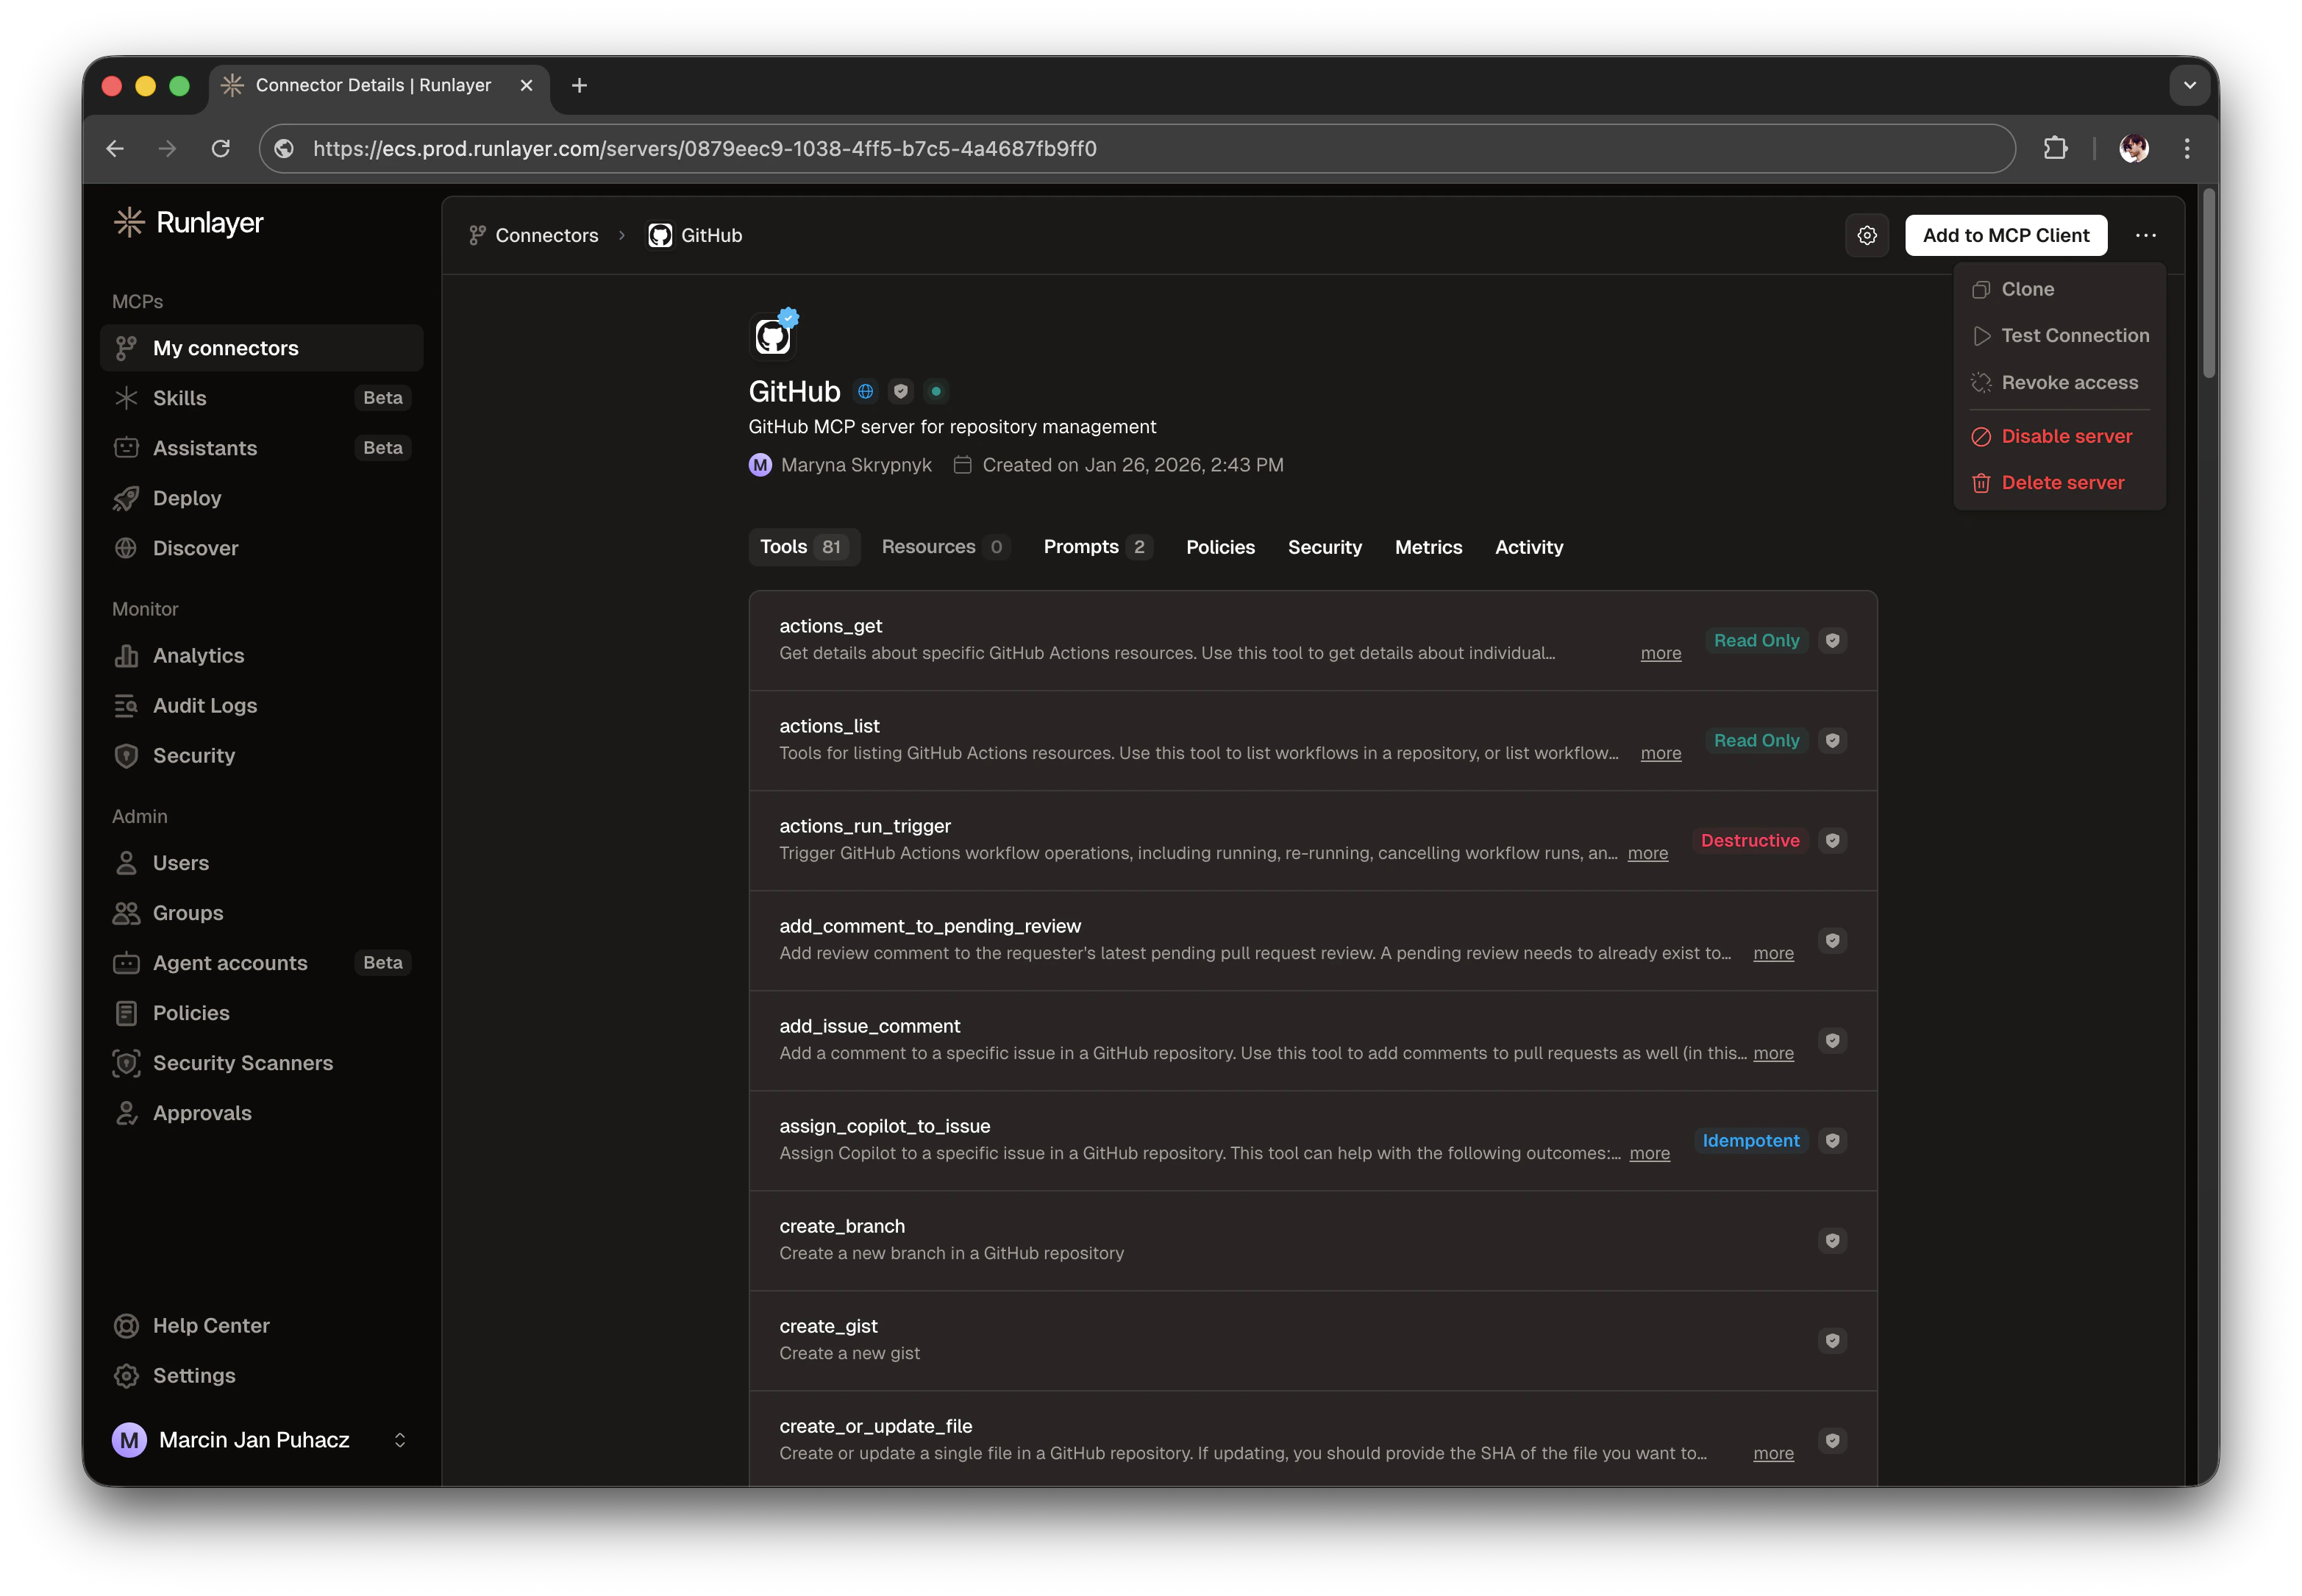
After successful authorization, you'll be redirected back to Runlayer. The server will now show:
* **Active** status
* List of available tools (e.g., `create_branch`, `add_issue_comment`, etc.)
* **Revoke access** option in the server settings
4. Review the requested permissions and select repositories
5. Click **Authorize** to complete the flow
After successful authorization, you'll be redirected back to Runlayer. The server will now show:
* **Active** status
* List of available tools (e.g., `create_branch`, `add_issue_comment`, etc.)
* **Revoke access** option in the server settings
 ## Troubleshooting
**Error**: "The redirect\_uri is not associated with this application."
## Troubleshooting
**Error**: "The redirect\_uri is not associated with this application."
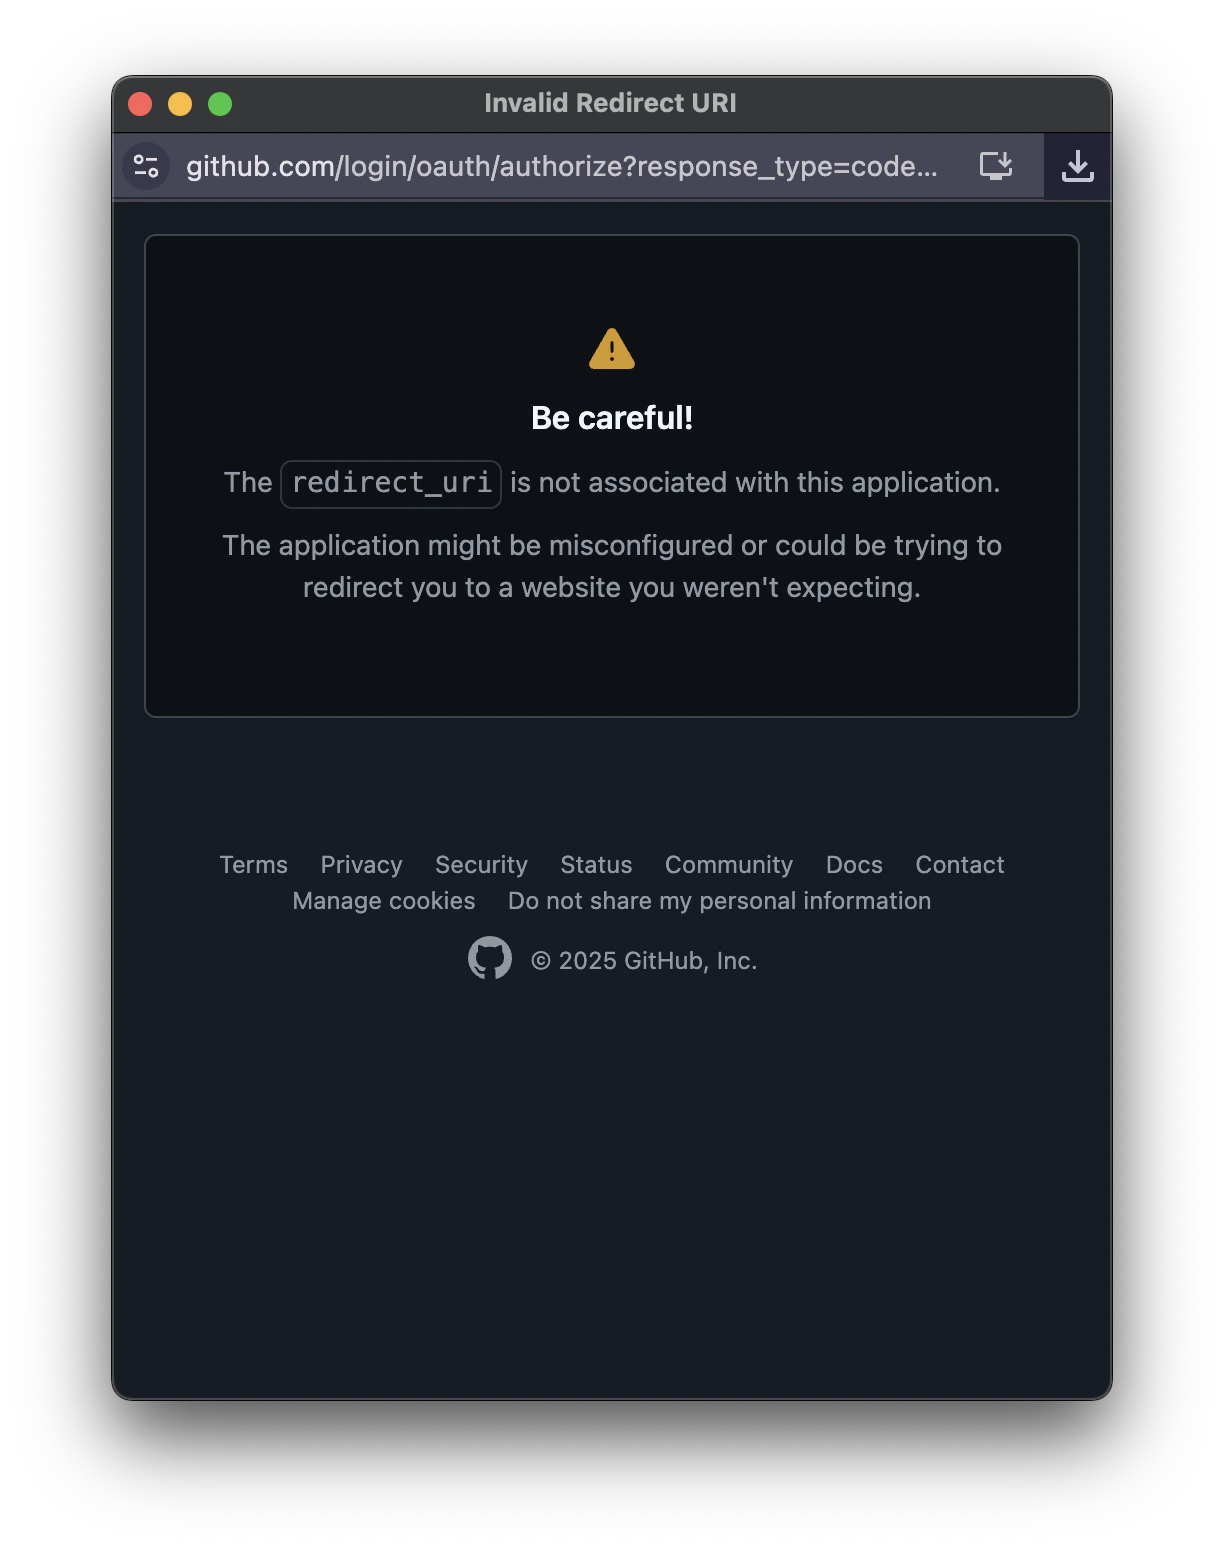 **Solution**:
* Verify the callback URL in your GitHub OAuth app matches exactly: `https://.runlayer.com/oauth/callback/`
* For self-hosted instances, ensure you're using the exact tenant URL
* The URL must include the trailing slash
**Issue**: Authorization popup completes successfully, but you see a "Failed to Connect" error in Runlayer.
**Solution**:
* Verify the callback URL in your GitHub OAuth app matches exactly: `https://.runlayer.com/oauth/callback/`
* For self-hosted instances, ensure you're using the exact tenant URL
* The URL must include the trailing slash
**Issue**: Authorization popup completes successfully, but you see a "Failed to Connect" error in Runlayer.
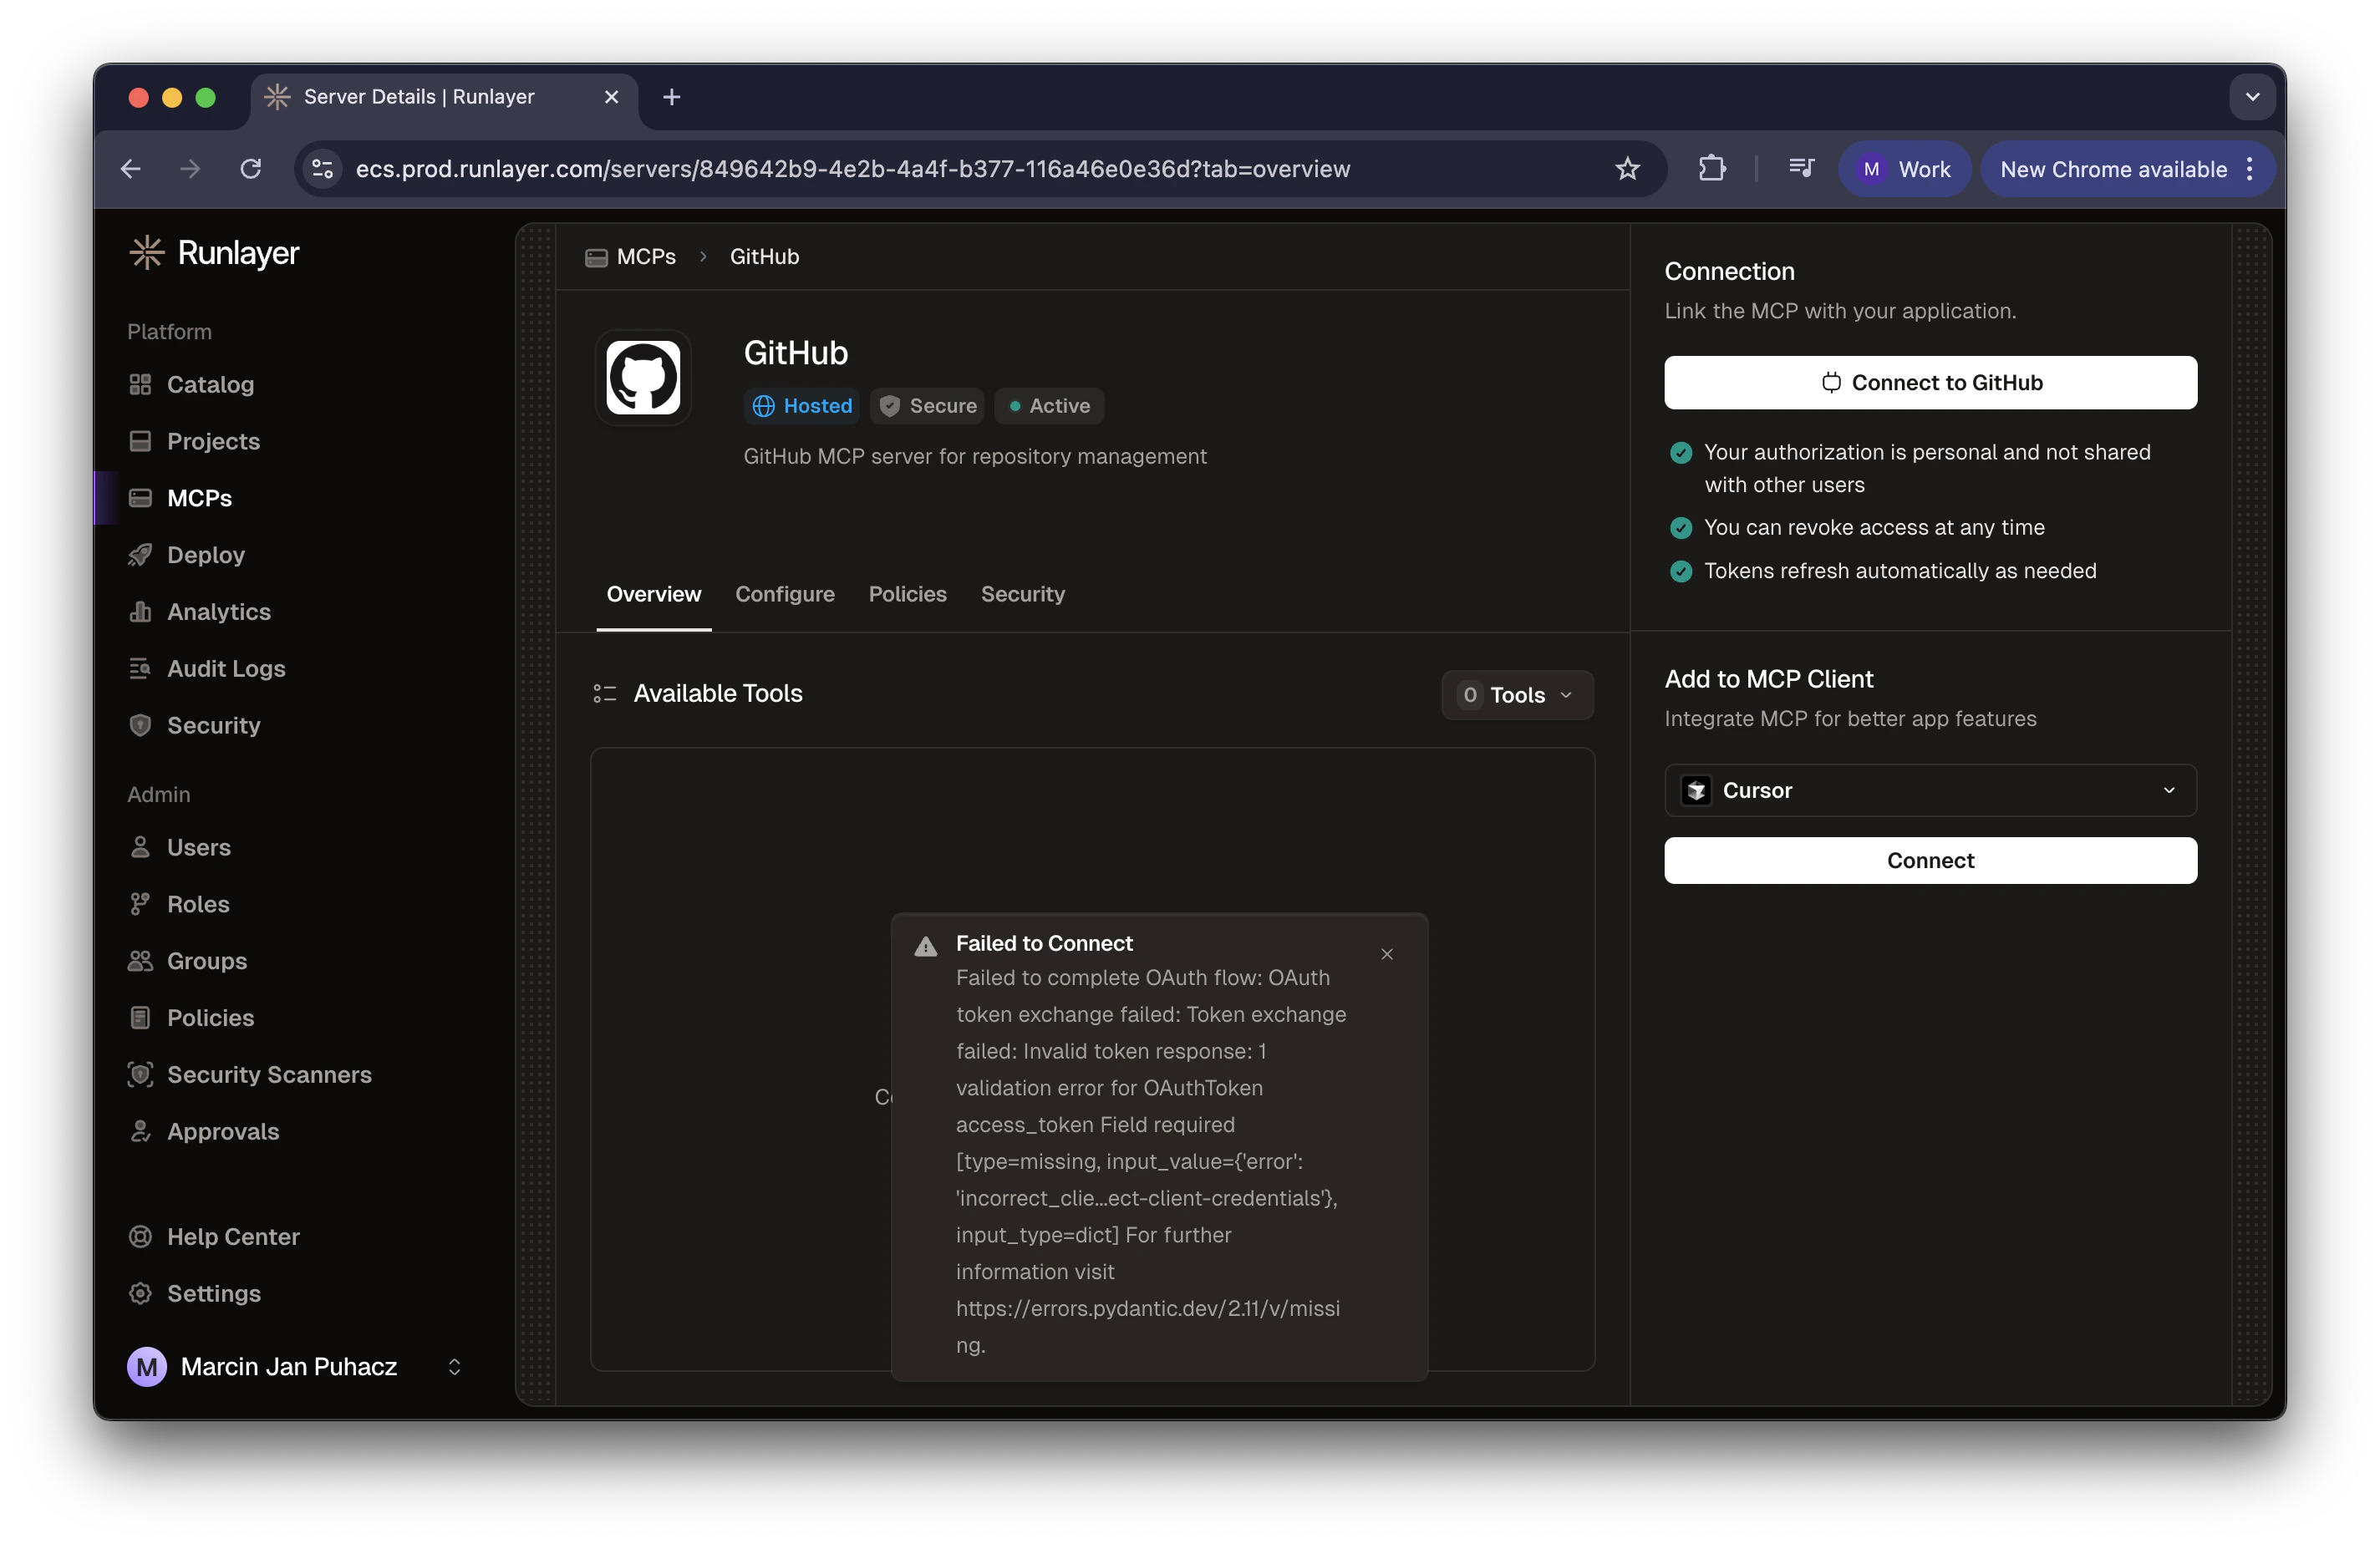 **Cause**: This occurs when the OAuth authorization succeeds, but the token exchange fails due to invalid Client ID or Client Secret.
**Solution**:
* Verify your Client ID and Client Secret are correct in the server configuration
* Check that you copied the Client Secret correctly (it's only shown once)
* Regenerate the Client Secret in GitHub if needed
* Ensure the credentials match the OAuth app you're using
* Try disconnecting and reconnecting the server with updated credentials
**Error**: "Invalid client credentials" or authentication fails
**Solution**:
* Double-check your Client ID and Client Secret are correct
* Ensure the Client Secret hasn't expired (regenerate if needed)
* Verify the OAuth app is active in your organization's Developer Settings
**Issue**: Server shows as connected but no tools are visible
**Solution**:
* Refresh the page
* Check that you authorized the required scopes in GitHub
* Try revoking and re-authorizing the connection
* Verify the server status shows "Active"
## Next Steps
Once your GitHub MCP server is set up and authorized:
* **Connect to your MCP client**: Use the "Add to Client" section to integrate with Cursor, VS Code, or other supported clients
* **Review available tools**: Browse the 40+ GitHub tools available for repository management, issue tracking, and more
* **Manage permissions**: You can revoke access at any time from the Connection section
Learn more about OAuth Broker and BYOC
Create other custom MCP servers
**Cause**: This occurs when the OAuth authorization succeeds, but the token exchange fails due to invalid Client ID or Client Secret.
**Solution**:
* Verify your Client ID and Client Secret are correct in the server configuration
* Check that you copied the Client Secret correctly (it's only shown once)
* Regenerate the Client Secret in GitHub if needed
* Ensure the credentials match the OAuth app you're using
* Try disconnecting and reconnecting the server with updated credentials
**Error**: "Invalid client credentials" or authentication fails
**Solution**:
* Double-check your Client ID and Client Secret are correct
* Ensure the Client Secret hasn't expired (regenerate if needed)
* Verify the OAuth app is active in your organization's Developer Settings
**Issue**: Server shows as connected but no tools are visible
**Solution**:
* Refresh the page
* Check that you authorized the required scopes in GitHub
* Try revoking and re-authorizing the connection
* Verify the server status shows "Active"
## Next Steps
Once your GitHub MCP server is set up and authorized:
* **Connect to your MCP client**: Use the "Add to Client" section to integrate with Cursor, VS Code, or other supported clients
* **Review available tools**: Browse the 40+ GitHub tools available for repository management, issue tracking, and more
* **Manage permissions**: You can revoke access at any time from the Connection section
Learn more about OAuth Broker and BYOC
Create other custom MCP servers