

Hosted by a third party. This MCP server is built and hosted by the
vendor, not Runlayer. This guide covers connecting it through Runlayer for
governance, policies, and audit.
mcp.slack.com.
Once connected, an agent can read and send messages, follow threads and channel history, search
the workspace, work with Canvases, and look up users. Each connection belongs to the person who
authorizes it, and connector actions use that person’s Slack identity and permissions.
Runlayer adds identity-aware policy, runtime scanning, and an audit trail around this access.
Admins decide what each agent can reach and who can use it.
Available Tools
Setup
Runlayer-managed connector OAuth (Recommended)
Runlayer-hosted deployments can use Runlayer’s Slack Marketplace app to authorize this connector. You don’t need to create a Slack app or provide client credentials. If you already have a Slack connector, use it. Connectors configured as a Pre-registered Client need the upgrade below before they can provision managed agent apps. If your connector already uses the Official Runlayer app, connect your account and continue to managed setup. If your workspace does not have a Slack connector yet:1
Add the connector
In Runlayer, go to Connectors > Add connector, choose Slack, and click
Create.
2
Authorize your Slack account
On the connector page, click Connect, select your workspace, and click
Allow.
Runlayer’s Marketplace app requests connector permissions and permissions to create and manage
dedicated Slack apps for agents in one authorization. Connector access, Slack notifications, and
dedicated agent apps remain separately enabled capabilities; Runlayer uses each permission only
when its corresponding capability is enabled and allowed by policy. See
Slack integrations for the workspace-level setup.
Upgrade an existing Slack connector
An administrator with connector-management and workspace-settings access can upgrade an existing Slack (Official) connector from Pre-registered Client to the Official Runlayer app. The upgrade keeps the existing connector; you do not need to add a second one.1
Open Slack integration settings
Go to Settings → Integrations and find Agent App Install Target in the
Slack Integration card. Click Upgrade Slack Connector.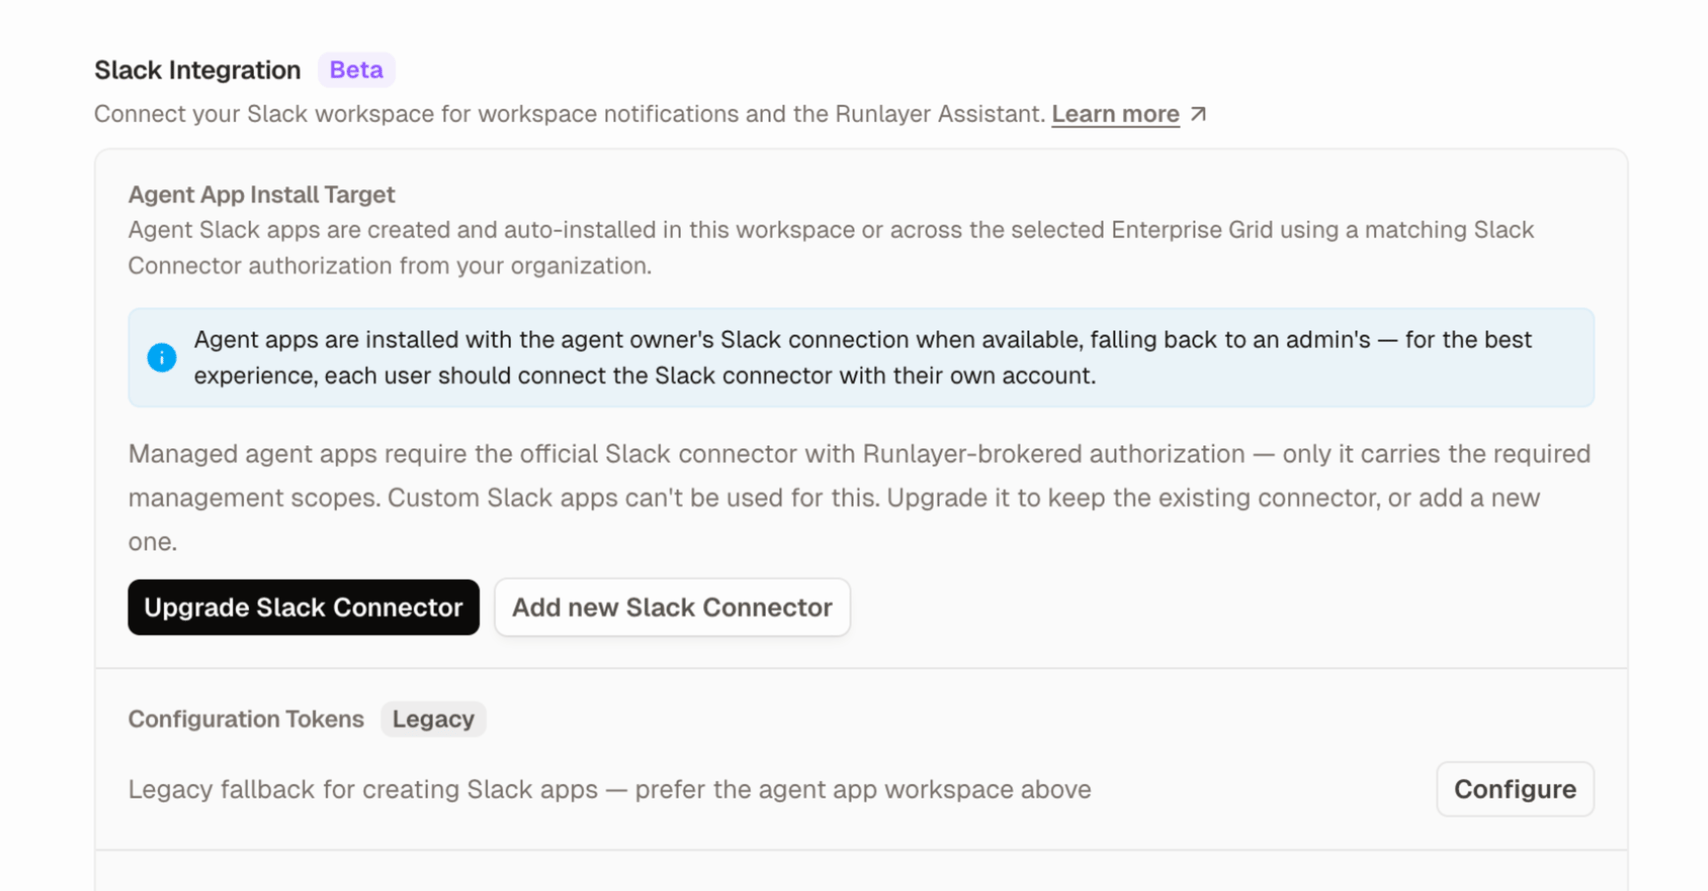
2
Review and upgrade the existing connector
Check the connector name. If several connectors are eligible, select the one
your workspace uses. View Connector opens its details.Confirm the change from Pre-registered Client to Official Runlayer app
by clicking Upgrade Slack Connector.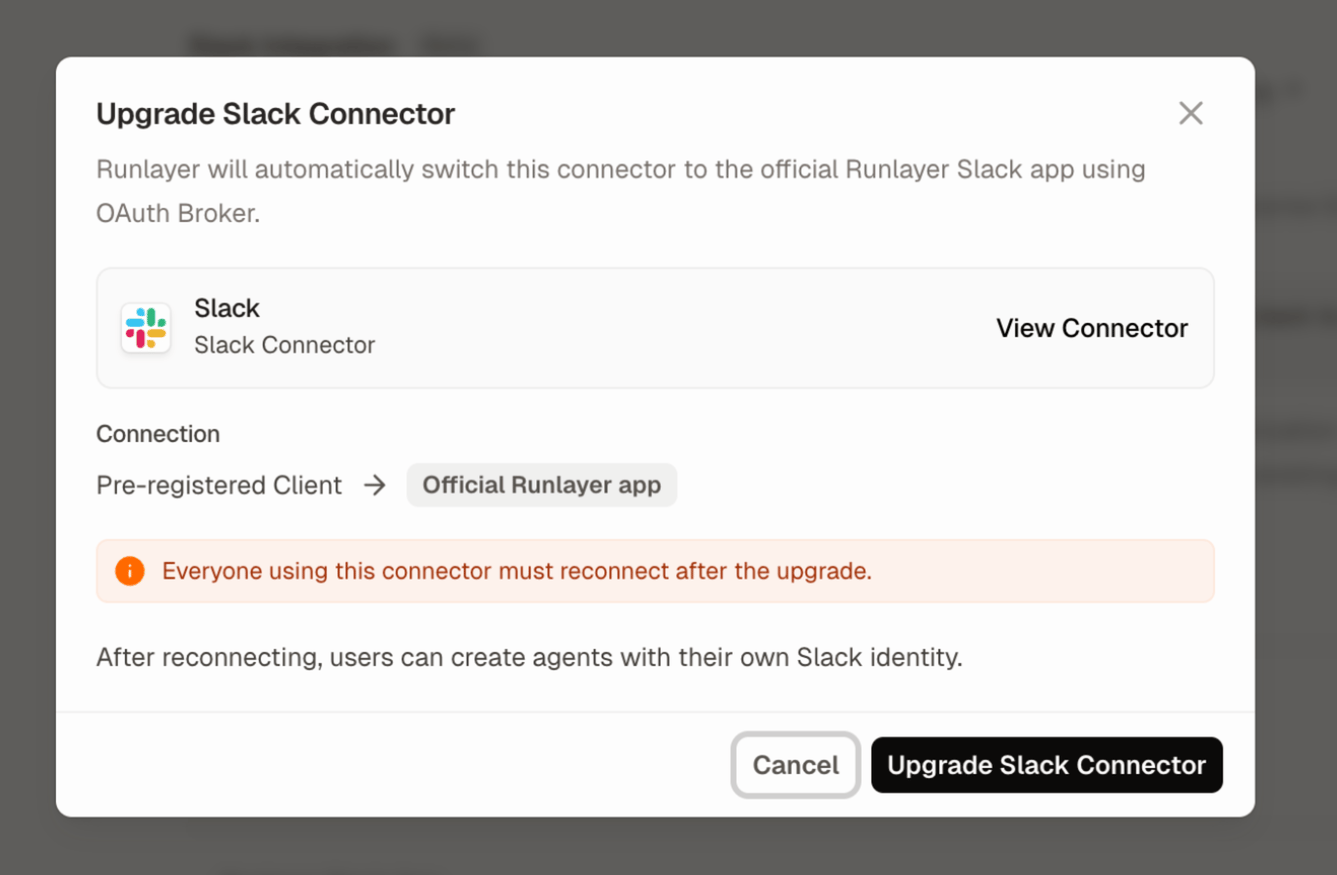
3
Reconnect your Slack account
Open the upgraded connector and click Connect. Select your Slack workspace
or organization, review the permissions, and complete authorization.Each person using the connector must reconnect their own account. An admin’s
reconnection does not reconnect everyone else.
4
Finish managed agent setup
Return to Settings → Integrations and confirm the Agent App Install
Target. If prompted, select the workspace or Enterprise Grid organization
and click Save. Use an account that can install apps in that target.You can then configure a new agent’s dedicated Slack app from its
Slack settings.
Upgrading the connector does not migrate or recreate existing Slack agent apps.
Existing-app migration is a separate action.
Bring your own Slack app
If your organization prefers its own internal Slack app, configure the connector as a Pre-registered Client.1
Create Slack App from Manifest
- Go to Slack API: Applications
- Click Create New App > From a manifest
- Select your workspace and click Next
- Paste this manifest, replacing
<your-runlayer-host>with your deployment’s host:
The bot user and
commands scope are required by Slack for org-wide installs but are unused by Runlayer.- Click Next, review the summary, then click Create
2
Enable MCP
- In your app settings, go to Agents & AI Apps in the sidebar
- Enable MCP Server for your app
3
Install App to Workspace
- Go to Settings > Install App in the sidebar
- Click Install to Workspace/Organization and authorize the app
4
Get Credentials
- Go to Basic Information in the app settings
- Copy the Client ID and Client Secret
5
Add the connector in Runlayer
- In Runlayer, go to Connectors > Add connector and choose Slack
- Under Show advanced settings, set Registration to Pre-registered Client
- Enter the Client ID and Client Secret
- Click Create
6
Authorize
- Click Connect on the connector page
- Select your workspace and click Allow
After you connect
Attach the Slack connector to any AI assistant or agent in Runlayer. It can then summarize threads, draft and send messages, search across channels, and work with Canvases within the policies you set. To give an agent its own Slack identity for mentions and DMs, separately configure dedicated Slack apps. Manage access, permissions, and audit logs under Connectors > Slack.Privacy
Runlayer’s handling of your data is described in our Privacy Policy.Troubleshooting
MCP access not enabled
MCP access not enabled
Runlayer’s managed Slack app is approved for MCP access. If you bring your own app, Slack requires
it to be an internal app or published in the Slack Marketplace. Check
Slack’s MCP documentation for current eligibility.
Redirect URI mismatch (bring-your-own-app)
Redirect URI mismatch (bring-your-own-app)
Verify your Slack app’s redirect URL is exactly
https://<your-runlayer-host>/oauth/callback with no trailing slash.Missing scopes error
Missing scopes error
Ensure all scopes from the manifest are added to your Slack app. The official MCP server requires specific scopes that differ from the standard Slack API scopes.